
Want to enable your users to select the date and time in your WordPress form? But don’t know how to create a WordPress date time picker form? Then, this easy tutorial is just for you.
If you’re thinking that adding a date time picker calendar to your contact form is an intimidating task, it’s not. In fact, with the right WordPress contact form plugin and tool, it’s just a piece of cake.
Hence, this article will walk you through a step-by-step guide to create a comprehensive contact form with a date time picker calendar. So, keep reading!
Why Add Date Time Picker in Your WordPress Forms?
Date time picker isn’t something that you always need to add to your WordPress forms. But there’re some specific cases where it’s a must to let your users choose the appropriate date and time effectively along with other essential information.
Let’s assume that your users want to schedule appointments for medical checkups or book restaurant tables, and so on. In such cases, you need to add the date time picker on your medical appointment and restaurant table booking forms.
Likewise, a date and time picker comes in handy when your users want to request a call-back. It’s also helpful if your employees or students want to ask for the leave on specific dates.
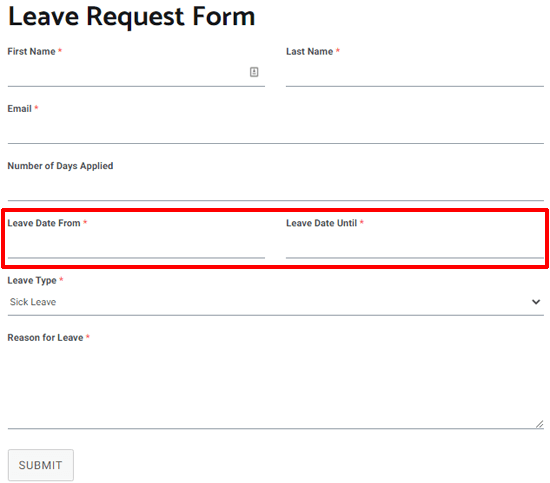
As you can see, there’re many reasons why you might want to add the date time picker on your WordPress forms. So, let’s get to know how to add a WordPress date time picker to your form next.
How to Create a WordPress Form with Date Time Picker?
You can follow the simple instructions given below to create a WordPress date time picker form in no time.
Step 1: Choose the Best WordPress Form Plugin with a WordPress Date Time Picker
Firstly, you need to choose a WordPress form plugin that lets you create beautiful contact forms with a date and time picker effortlessly. We understand that selecting one from the ocean of options is overwhelming. That’s why we recommend using Everest Forms.
Everest Forms is an evergreen drag and drop form building solution to create the variable form types that captivate your users. Whether you wish to create simple contact forms, call-back forms, online hotel booking forms, or leave request forms, your wish is granted.
This plugin offers top-notch features like pre-designed form templates, unlimited form fields, email notifications, smart conditional logic, and more. Likewise, it has a clean and user-friendly interface. And if you ever get stuck anywhere, you can contact the friendly support team to get your issues solved quickly.
Step 2: Install Everest Forms Plugin
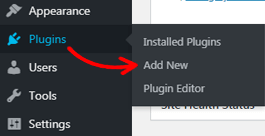
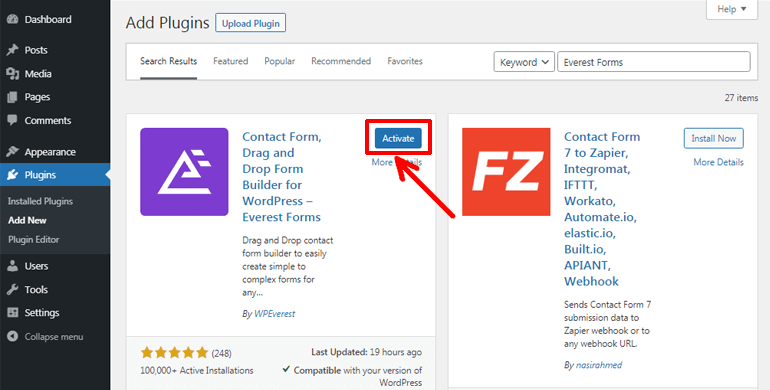
To install the Everest Forms plugin on your site, go to Plugins >> Add New from your WordPress dashboard.
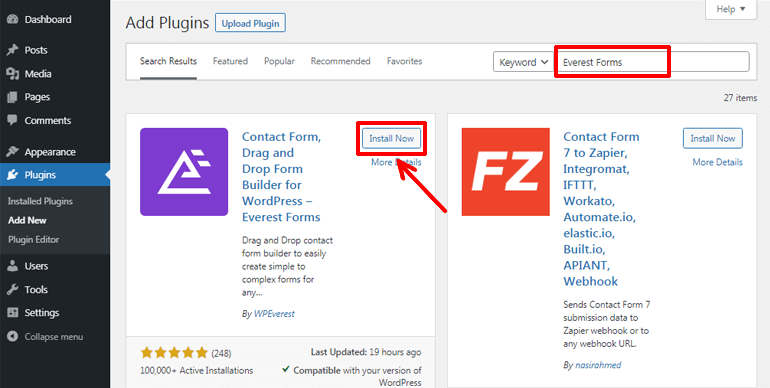
It’ll direct you to the Add Plugins page. Here, you can type the plugin’s name that you want to install in the search bar. As soon as you type Everest Forms, the plugin is shown right onto your screen. Now, hit the Install Now button.
Finally, click on the Activate button to activate the plugin on to your site.
Note: If you like what a free version of the Everest Forms plugin offers, you can upgrade to its pro-version to enjoy more features and functionalities.
Step 3: Create a New WordPress Form
After installing and activating the Everest Forms plugin, go to Everest Forms >> Add New. Now, from the Add New Form page, you can either choose from different pre-built form templates or start from scratch.
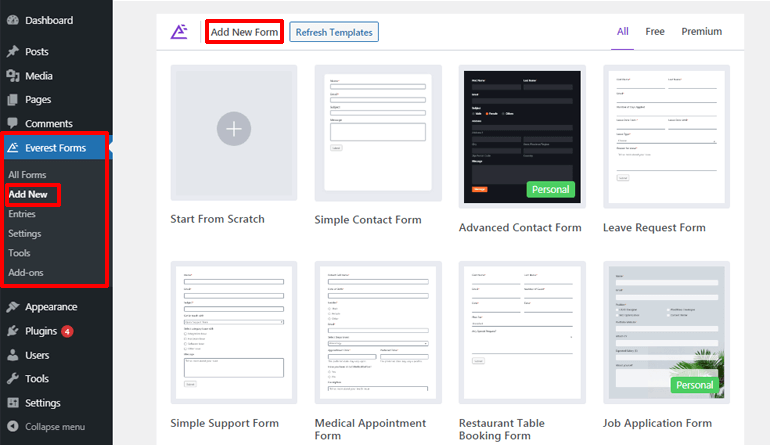
No matter whichever option you choose, the plugin’s intuitive drag and drop interface lets you make the desired form easily.
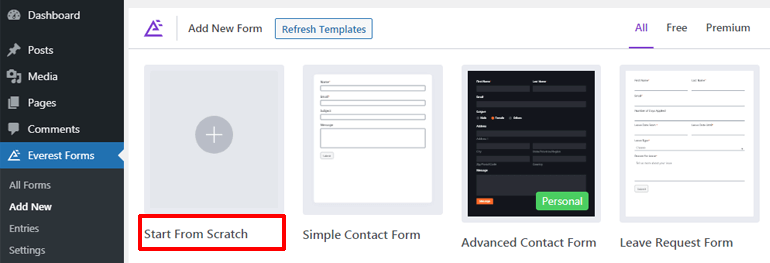
This tutorial will show you how to create a WordPress contact form with a date time picker from scratch. So, firstly, click on the Start From Scratch option.
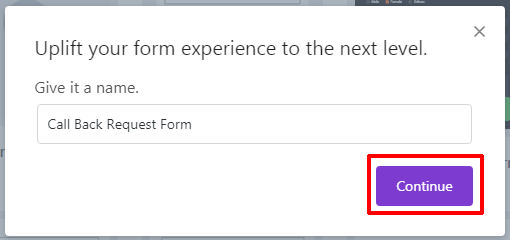
After that, provide a suitable name for your form and press the Continue button.
A form editor window will open up. And now, you can start adding the required form fields to your form.
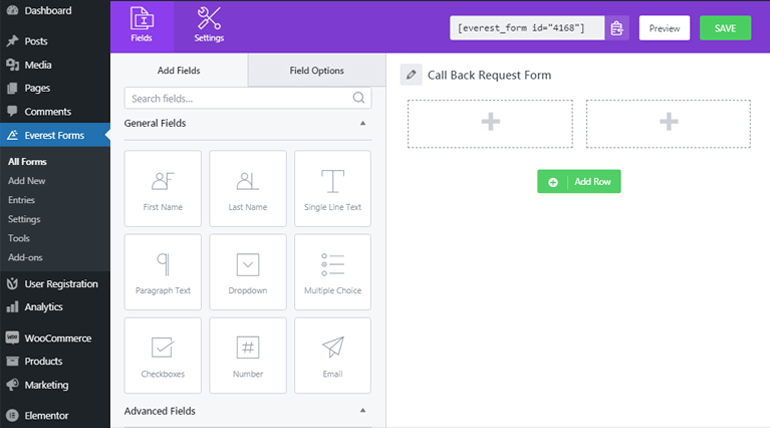
Add the Required Form Fields and Date Time Picker
You can easily drag the form fields like Name, Email, Phone, etc., from the left and drop them to the blank area on the right-side. Also, you can use the form fields like Single Line Text and Paragraph Text to retrieve information in a single line and paragraph form.
Similarly, to add a date and time picker calendar to the form, drag the advanced field Date/Time from the left hand and drop it to the required area.
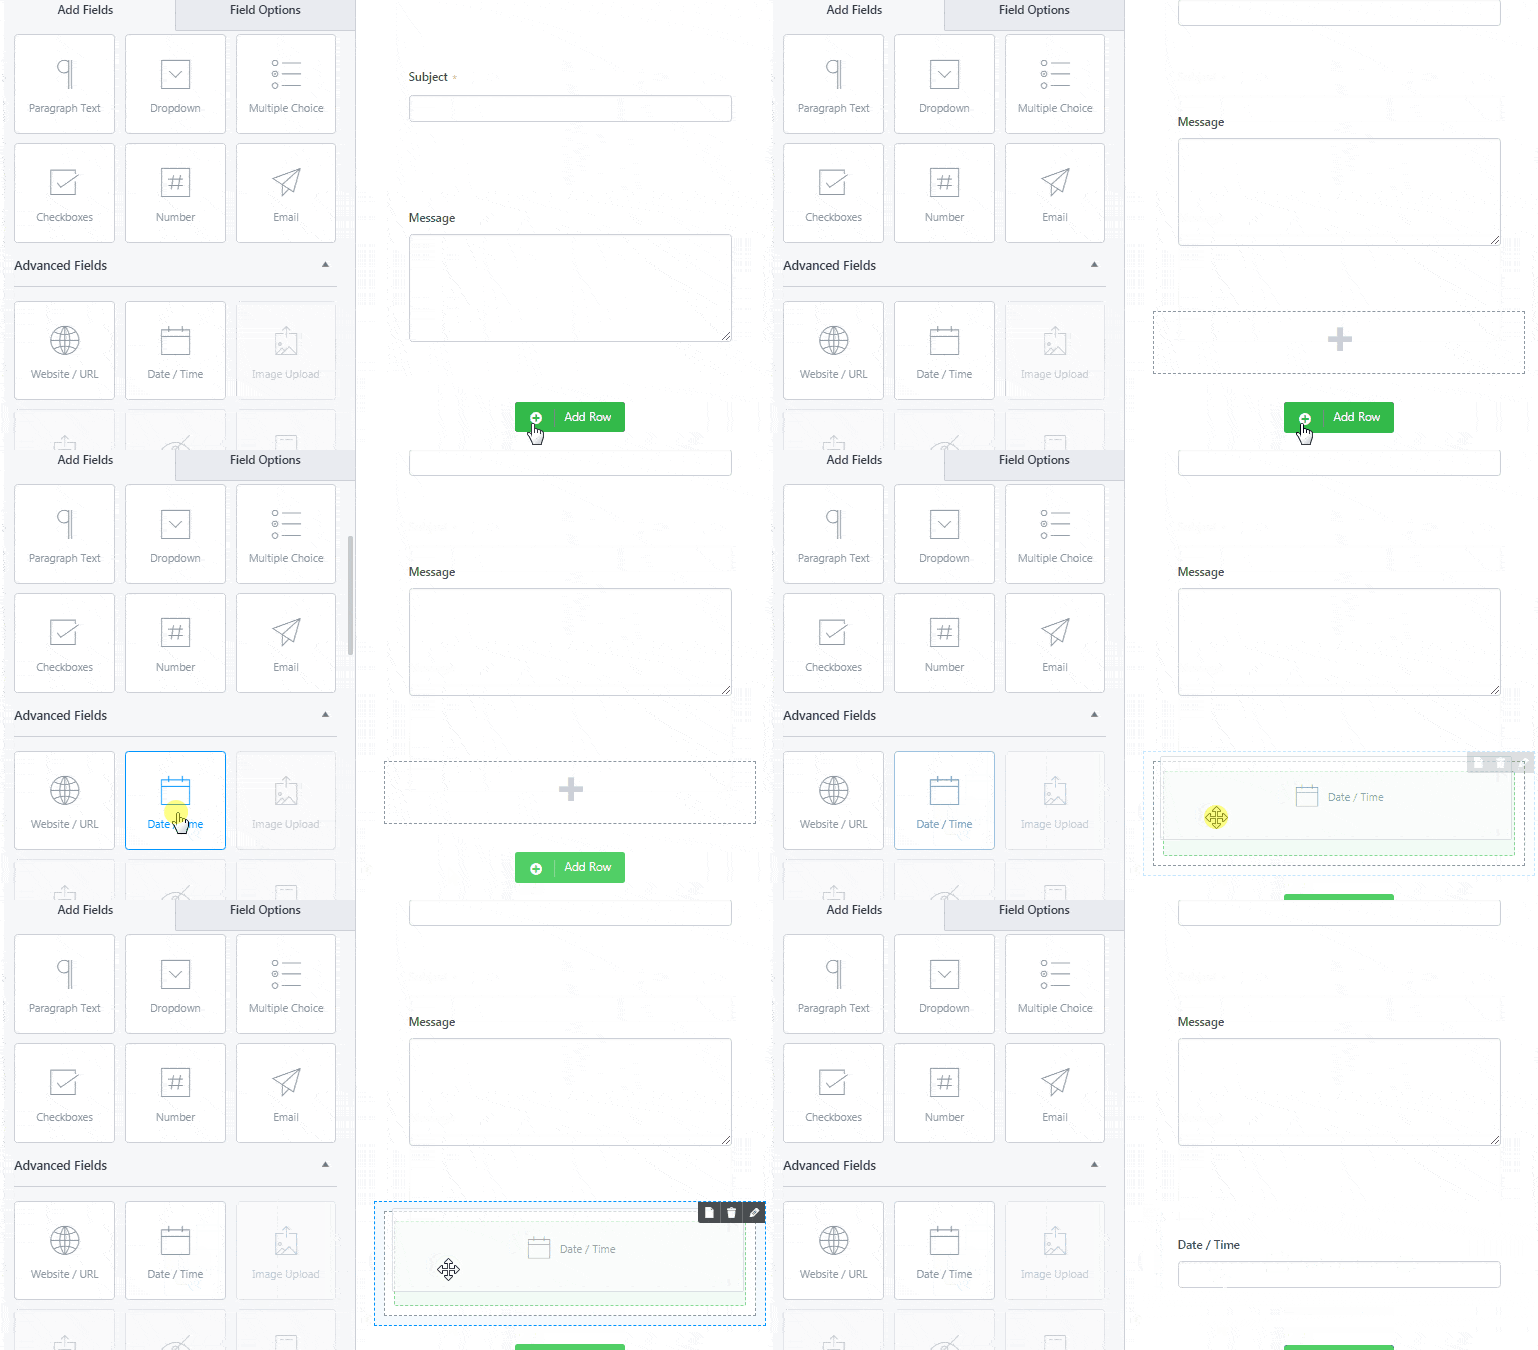
Other additional fields can also be added to your form in a similar manner. Not to mention, it’s also possible to rearrange and reorder the form fields as necessary. Just drag and drop the field to the required area. That’s all!
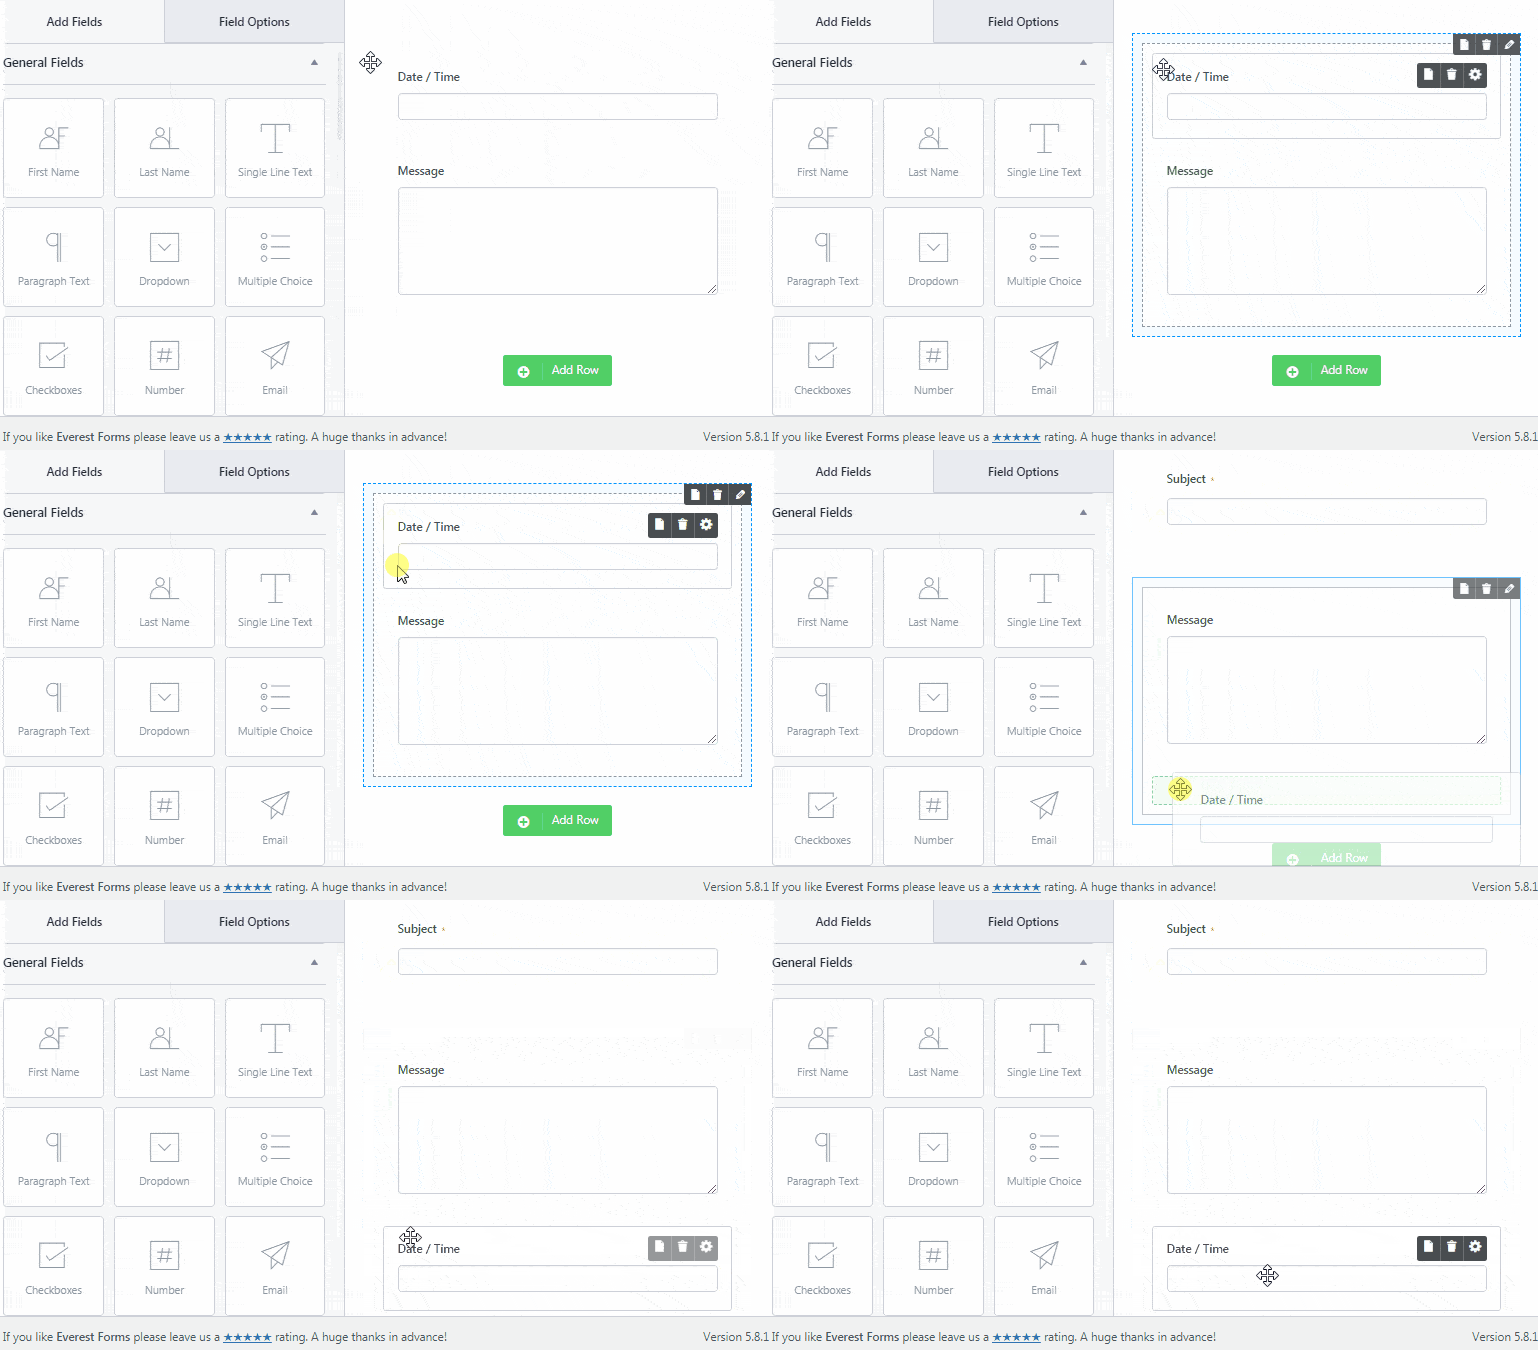
Customize the Form Fields and a Date Time Picker
With Everest Forms, it’s super easy to customize the form fields at your convenience. For this, click on the Field Options, and you can edit the label, description, and more of the individual form fields.
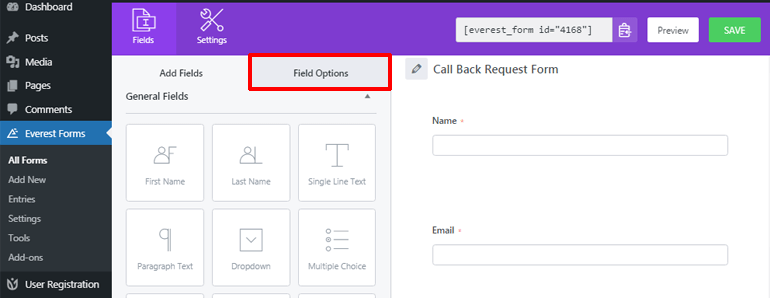
Correspondingly, you can click on the Date/Time field to customize it to your need. You can change its label and format without any hassle. For instance, we’ve labeled it as Preferred Date. Likewise, talking about the format, you can allow your users just to pick the date, time, or select both from here.
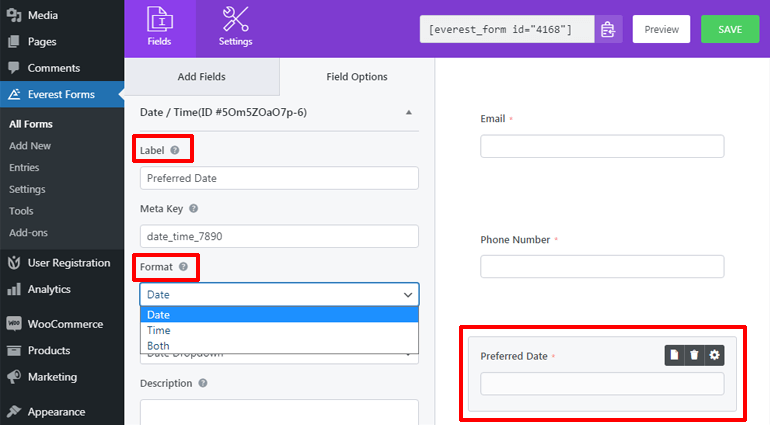
Also, you can choose from the two style setting options for the date/time field, i.e., Date Picker and Date Dropdown.
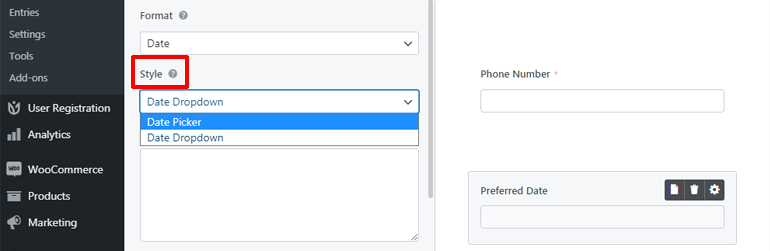
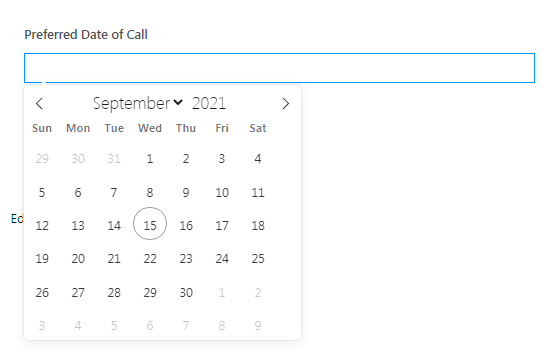
Date Picker lets your users select the date from the calendar style date menu, which looks something like this from the frontend.
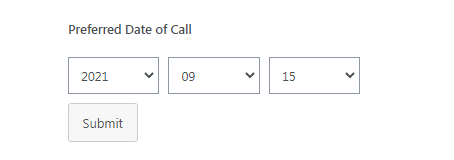
On the contrary, Date Dropdown lets users select the date from the dropdown date menu. The dropdown date selector looks like this from the frontend.
Besides, you can add a short description to the field and even make the field required so that users won’t be able to proceed without filling this field.
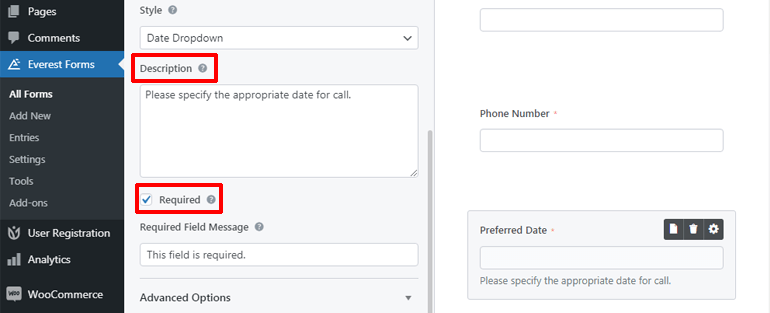
And if you scroll down a little, you can also find the Advanced Options from where you c an further customize your date and time settings. From here, you can add the placeholder text and choose from four different Date Format.
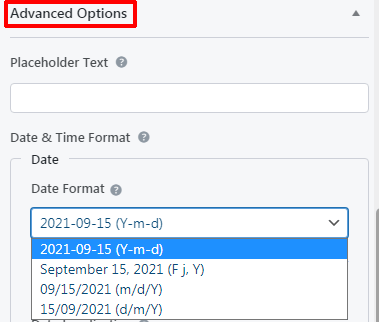
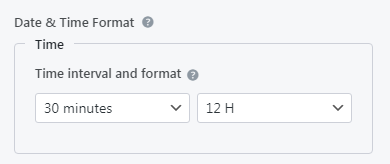
Not to mention, you can also choose the Time interval and format.
Besides, Disable Date option lets you disable the dates in your form. Doing so will disable users from selecting those dates.
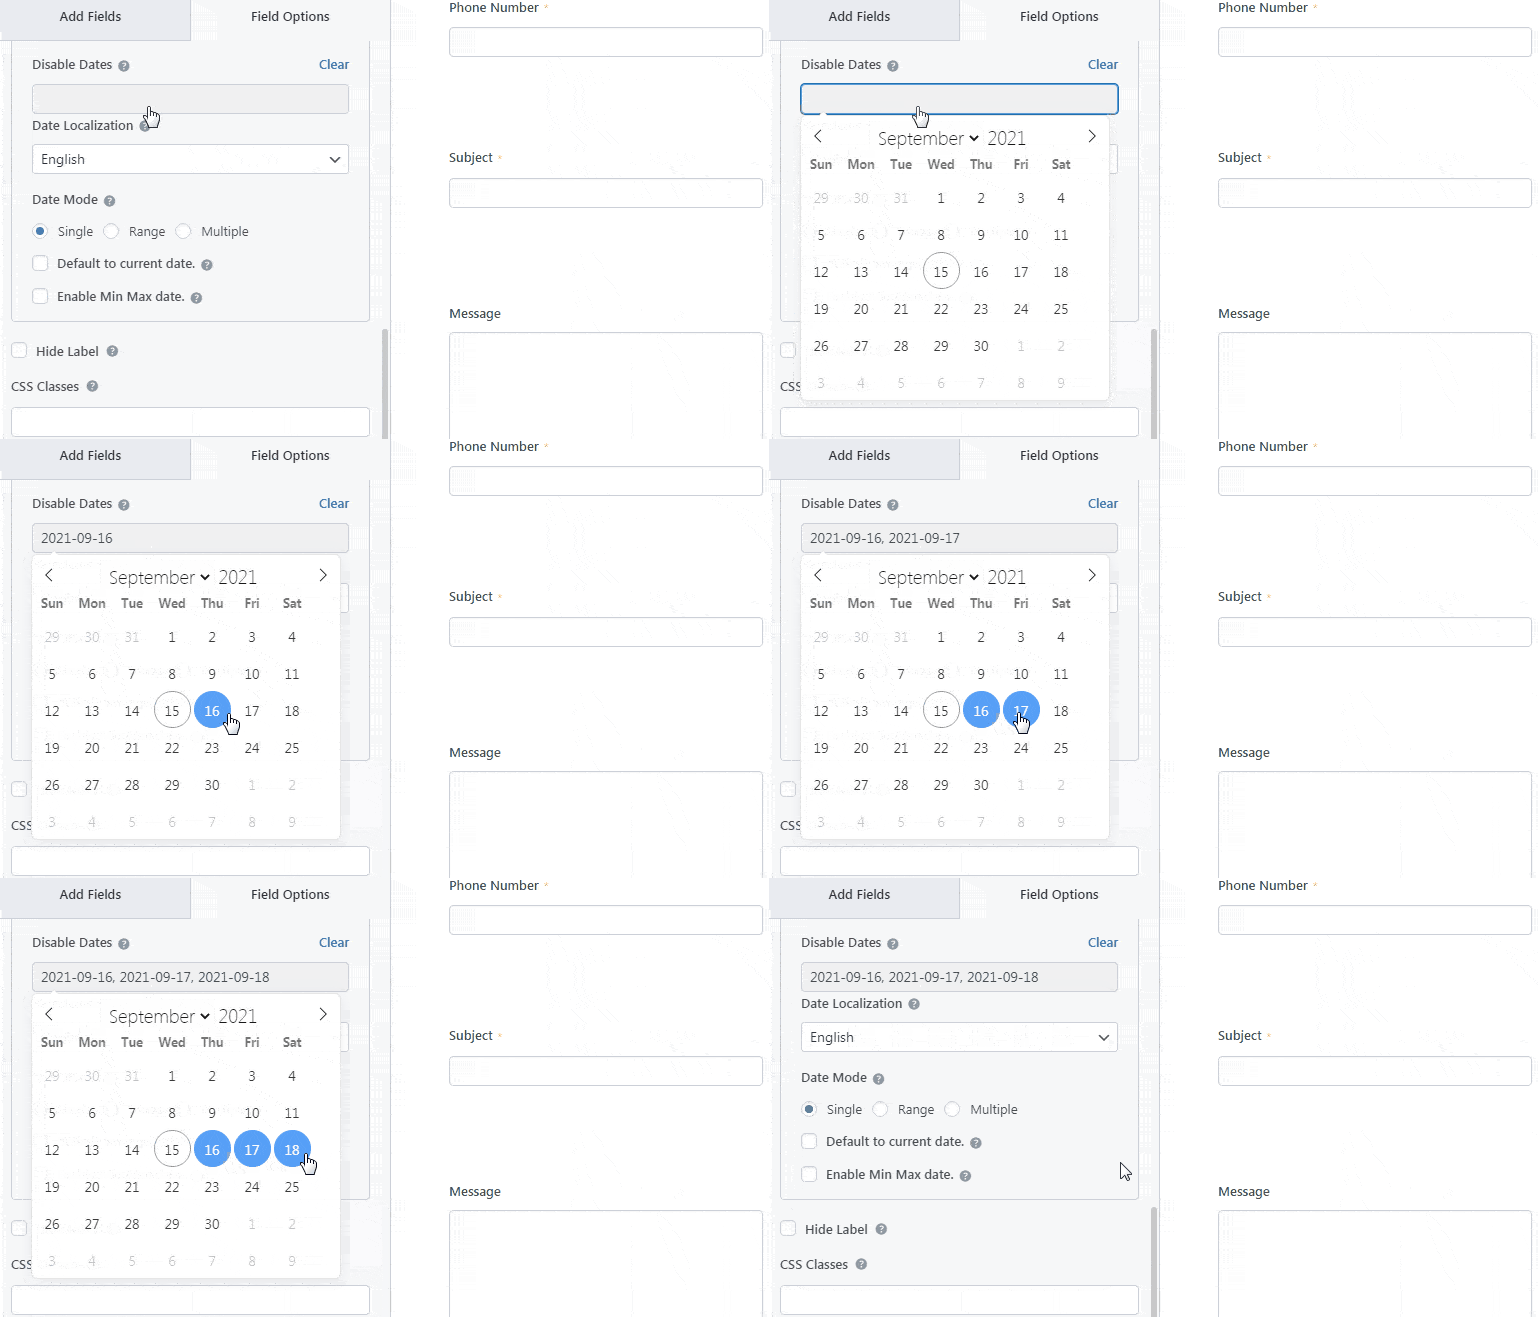
Moreover, you can select the desired date localization to display. And there’s three different Date Mode you can choose from. They’re Single, Range, and Multiple. The Single date mode allows users to pick a single date. Ranger mode allows selecting the suitable date range. Users can pick multiple date options with Multiple date mode.
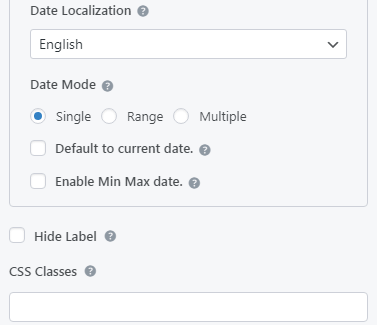
Also, you can set the default date to the current date and enable minimum and maximum dates for selection. Again, if you’re an advanced user, you can do more to the date field with CSS classes.
Step 4: Customize the Form Settings
You’ve successfully created a WordPress form with a date time picker calendar, but it’s incomplete unless you configure the necessary form settings. So, below we’ll talk briefly about the general form configuration and email settings.
Configure General Form Settings
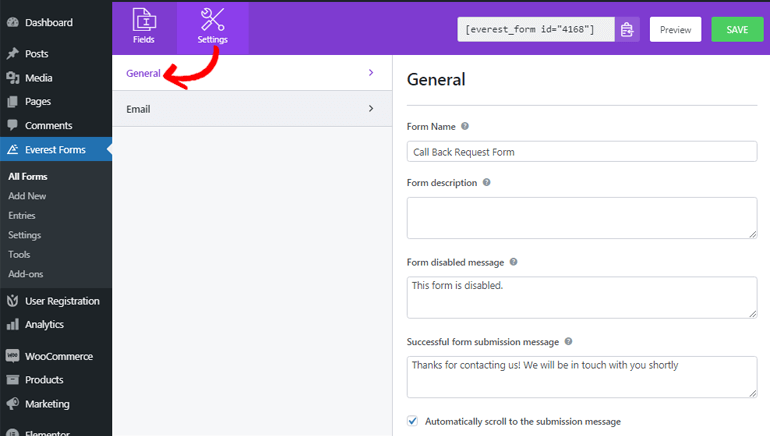
To configure the general form setting options, navigate to Settings >> General. Your form name and description can be edited from here. You can also enter the form disable message and successful form message.
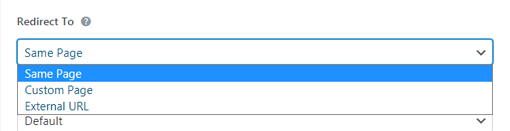
With Redirect To option, you can allow your users to land on the URL or page of their interest once they submit the form.
The Layout Design and Form Class option lets you choose from different form designs and add a class to your form. Under the Submit Button section, you can add the desired submit button text, submit button processing text, and submit button class.
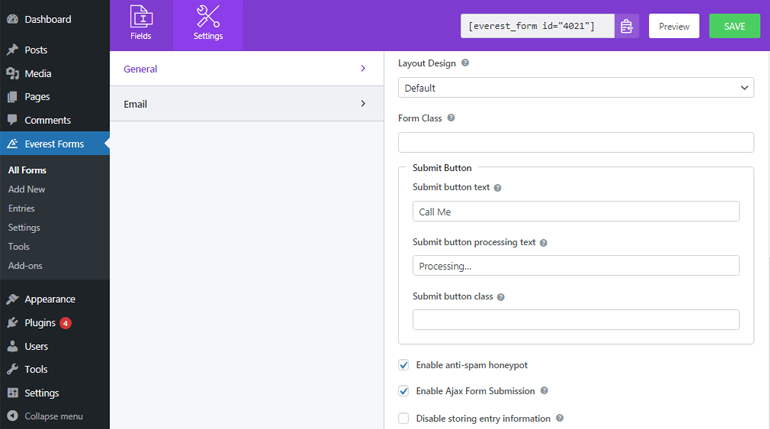
Furthermore, you can protect your form from spam by enabling an anti-spam honeypot. Likewise, let your users submit the form without reloading by enabling ajax form submission. You can also enable or disable storing entry information according to your need.
Configure Email Settings
Email settings allow you to configure where the emails need to be delivered after the form submission. The good news is Everest Forms enables configuring multiple email notifications. For instance, an admin email notification is triggered to the admin, whereas a user email notification is triggered to users.
You can navigate to Settings >> Email to configure email settings. Firstly, make sure the email settings option is toggled on to start managing email notifications. Then, you can start setting admin email notifications.
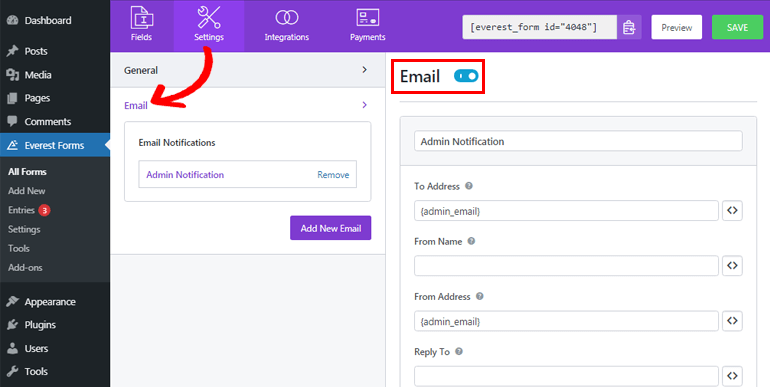
In the To Address field, input the email address where you want the email to be delivered. Since we’re configuring the admin email, you can enter the admin email here. Even better, you can use the smart tag {admin_email} to capture the admin email address automatically.
The From Name section displays the name of the user who submits the form. You can capture the name of the user using a smart tag. As easy as that! However, you need to ensure that you make the name field required so there won’t be any problem during email delivery.
From Address lets you add the email address from where the form is sent. So, you can add the admin email here as well.
Reply To allows entering the email address where you would like to reply once you receive the email. Therefore, you can use the smart tag as before to grab your user’s email.
On top of everything, you can also add email subject and message. Using {all_fields} smart tag in the email message displays all the form field information filled by your users, including the date and time.
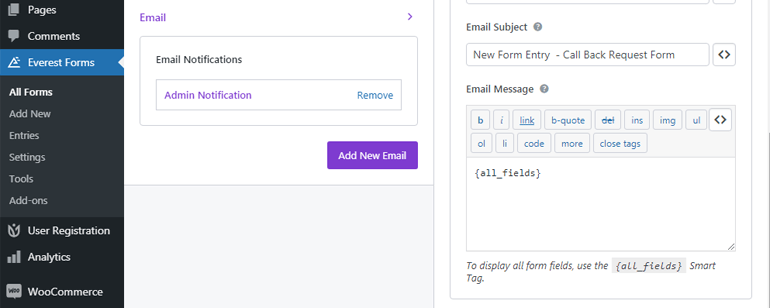
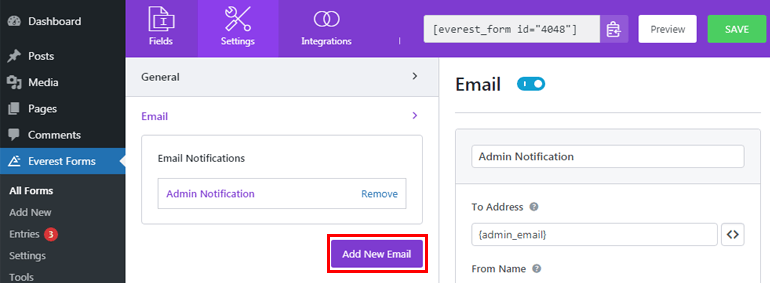
Now to set the new email notification, you can click on the Add New Email button.
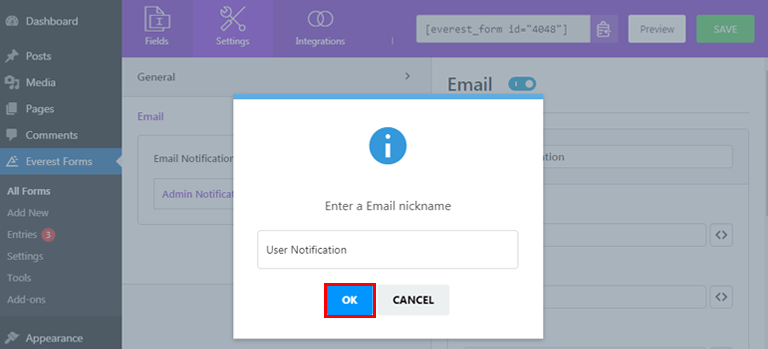
After that, give it a name. For instance, if you’re setting a user email, you can name it User Notification.
Next, you can set up the user email notification as we did for the admin before.
Step 5: Add the WordPress Date Time Picker Form to Your Site
To make your form visible to your users, you need to add it to your site first. Everest Forms allows you to add your WordPress form to the posts or pages or wherever you find it suitable.
Here, we’ll show you how to add your WordPress form with the date time picker calendar to the posts.
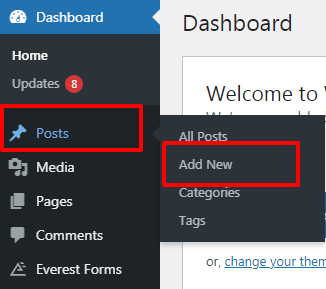
From your dashboard, navigate to Posts >> Add New.
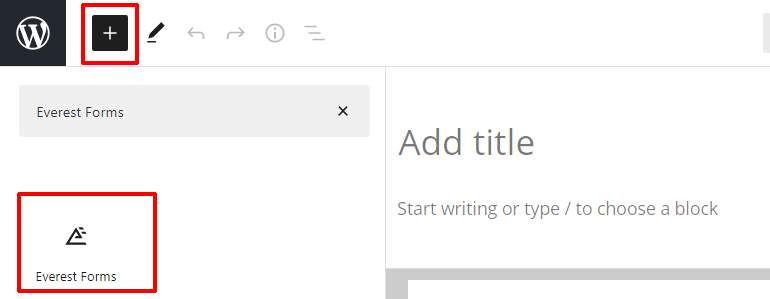
Then, click on the Add block (+) button at the top. Again, search for the Everest Forms block and click it.
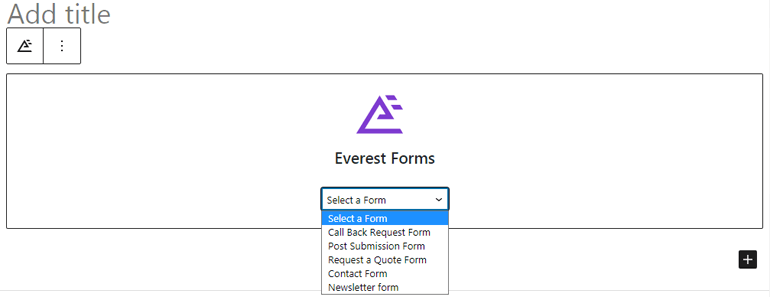
Now, press on the dropdown menus to choose the required form.
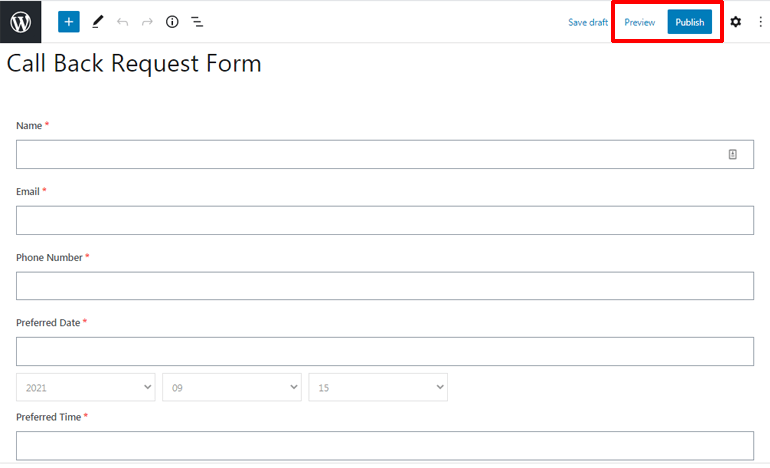
Finally, provide a title to your form and click the Publish button to see your form in action. Also, you can preview your form to view how your form looks from the frontend before making it live.
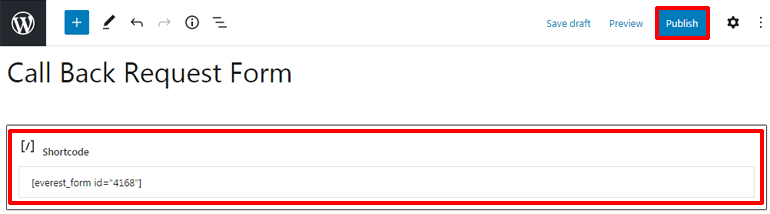
Alternatively, you can go to Everest Forms >> All Forms and copy the shortcode of the required form.
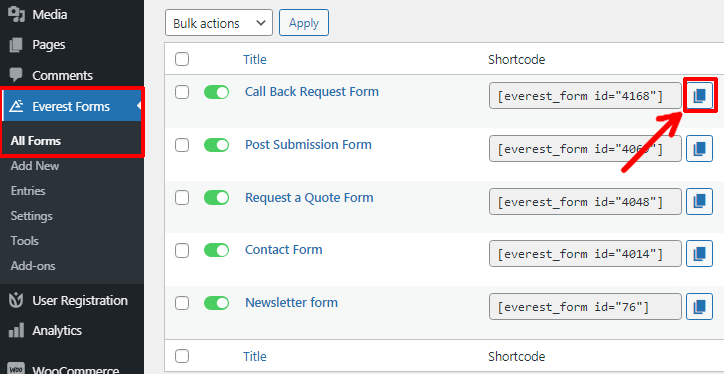
Next, paste the shortcode to the Posts or Pages you like. Lastly, hit the Publish button.
Conclusion
So, this is how you create a WordPress form with a date time picker. With Everest Forms, you can add date pickers of different styles to your forms. All the forms you create using this plugin are mobile-friendly and adapt perfectly to any screen type and size.
Hopefully, you can easily make a WordPress contact form with a date time picker calendar now. If you think this article was helpful, make sure you share it on your social platforms as well.
Also, you can follow us on Twitter and Facebook for more updates.
Still got some spare time? Then, you can check our article on creating a job application form.






![Zakra 3.0 | Zakra Pro 2.0 Release [Major Updates!]](https://i.ytimg.com/vi/g3rifl7kWvg/maxresdefault.jpg)