
Want to learn how to schedule form submission date and time in WordPress? We’ll teach you how.
Scheduling your forms in WordPress is a very useful and essential feature that makes your work easy. Simply schedule your forms, and that’s it; you no longer have to remove forms after their deadline manually.
So, in this article, we’ll give you an easy step-wise guide on scheduling form submissions in WordPress.
But before that, let’s find out how scheduling your forms can help you.
Why Schedule Your Forms in WordPress?
Imagine a scenario where you just published a job application form on your WordPress site. You’re getting a good number of responses and you successfully recruited a candidate. Finally, the position’s taken, but you still get submissions through your application form.
This could be solved by scheduling your form submission date and time to limit form submissions.
Besides, you can use it on appointment booking forms, event registration forms, and so on to avoid form submissions after the deadline.
Furthermore, you can also enjoy the benefit of the peak traffic hours. Each website gets the peak of its users at a specific time of the day. So, when you publish it, you can leverage existing traffic. Doing this will increase page views.
These are a few examples where this feature comes in handy. We’re positive you can come up with more.
Now without further delay, let’s find out how to schedule form submission date and time in WordPress using Everest Forms.
How to Schedule Form Submission date and Time in WordPress Using Everest Forms?
The very first thing you need is to decide which plugin supports your form scheduling. This is where the best drag-and-drop plugin, Everest Forms, can help you.
The reason why it could be the best choice is that it offers you the Form Restriction add-on. Using this add-on, you can schedule WordPress forms for your website.
You can easily set the start and end date for the form. Furthermore, you can add messages to notify users when a form will open or close.
Therefore, we’ll use Everest Forms in this guide to help you set a time limit on your WordPress Forms quickly.
Let’s begin.
Step 1: Install and Activate Everest Forms and Everest Forms Pro
To begin with, ensure that you’ve successfully installed and activated Everest Forms and Everest Forms Pro.
You require the plugin’s premium version to extend the free plugin with the Form Restriction add-on.
So, pick a suitable plan from one of the pricing plans and set up the plugin on your site.
Step 2: Install and Activate the Form Restriction Add-on
After successfully setting up Everest Forms Pro, you can install any Everest Forms Add-on.
Simply go to Everest Forms >> Add-ons.
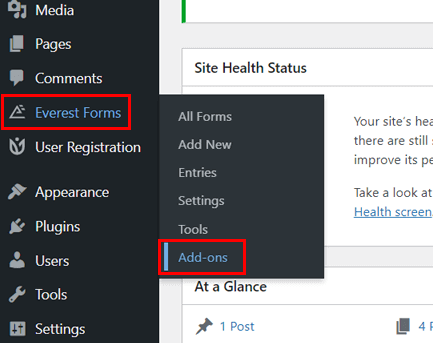
Then, search for Form Restriction add-on. Click on the Install Addon button and press Activate.
You’ll know the plugin is active when the status says “Activated.”
Step 3: Create a New Form
After completing all the installations, you can create a form to schedule form submission.
Everest Forms offers a wide range of pre-built templates and plenty of custom fields. So, you can create any form you need, such as contact forms, newsletter signup forms, leave request forms, etc.
Not to mention you can also set a time limit on any of these forms.
So, to create a new form, either start from scratch or use a pre-existing template.
If you wish to create a new form, click Start From Scratch. For the pre-built template, go to Everest Forms >> Add New.
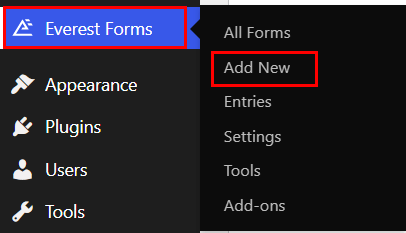
Now, you’ll see a variety of free templates. You can choose one according to your preference. For this tutorial, we’ll use our Job Application Form template. And we’ll set a time limit so that it can automatically close on the submission deadline.

All the required fields are already present in the form. However, you can add more fields and customize them without any restrictions.
For a detailed guide, refer to the article on how to create an online application form on WordPress.
Once the form building is complete, hit the Save button at the top.
Step 4: Enable and Configure Form Scheduling
Now that your form is ready, you will start the most crucial part of this process. That is to enable and configure form scheduling.
For that, open your Settings tab. Here, you can see the Form Restriction option. Once you click it, it will show you the Form Scheduling option. You have to enable it by toggling the button on.
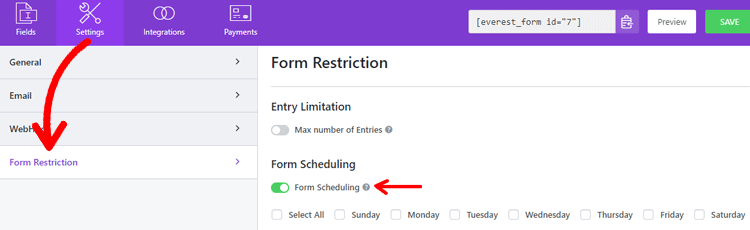
Right after you enable this option, you’ll be allowed to schedule your form for different days of the week. For that, you must select the day you desire, weekdays or weekends.

Similarly, you can also set the submission date and time. To do so, enable the Date Scheduling and Time Scheduling. Doing this will allow you to configure the Submission Start and Submission End for both date and time.
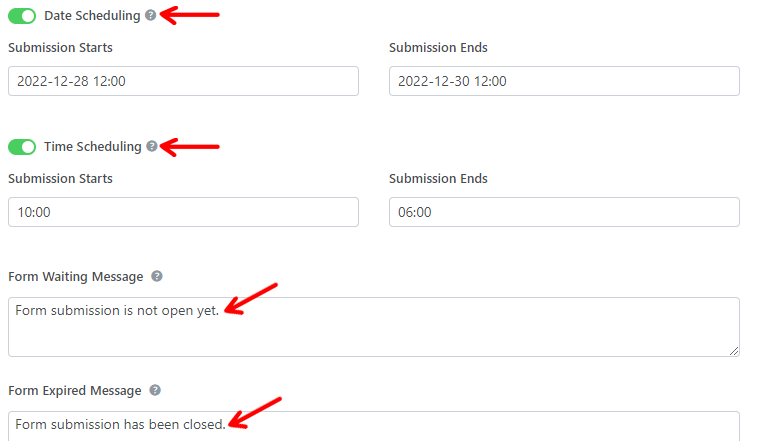
Furthermore, from the Form Waiting Message option, you can edit the popup message while your users are waiting. Likewise, the Form Expiry Message option lets you modify the message to be displayed if the form is submitted past the expiry date.
Don’t forget to hit the Save button to save all the changes.
Step 5: Add your form to your website
The next step is to publish the form on a page on your site.
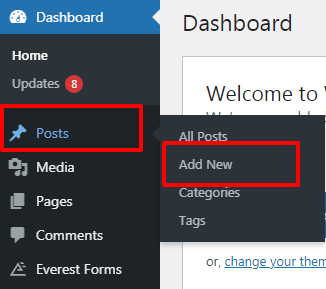
For that, go to Post/Page >> Add New from your dashboard.
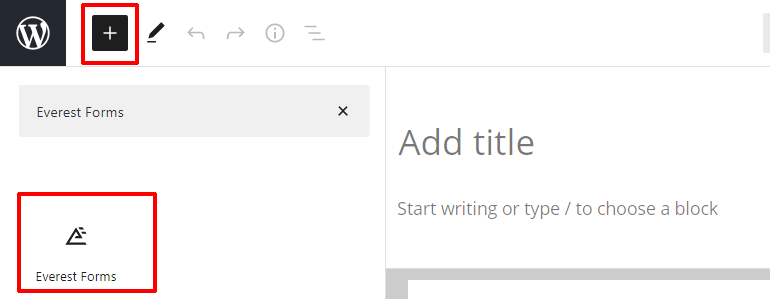
Then click on the plus icon (+) to add a new block. Next, please search for the Everest Forms block and add it to the post/page.
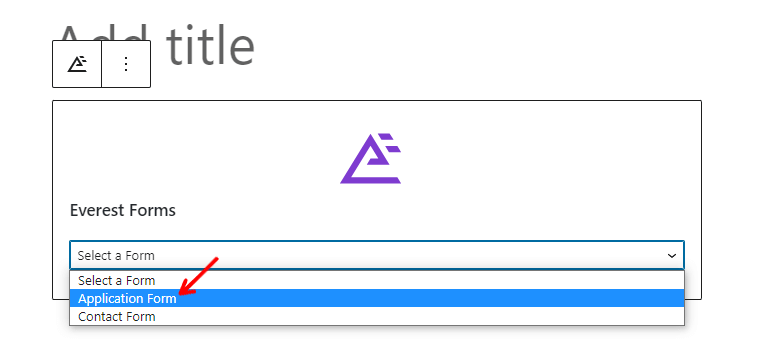
After that, you can select your form from the drop-down.
If you want a preview of how your form looks in the front, click the Preview button.
Finally, you can hit the Publish button at the top.
Wrapping it up:
So that’s it. Now, you know how to schedule the submission date and time in your WordPress form. With Everest Forms Form Restriction add-on, you can easily schedule your form submission date and be confident in timely submissions.
You can do much more with this powerful plugin, like adding date range and multiple dates in WordPress Forms, enabling conditional redirection after form submission, and more.
If you’re interested, read up on more articles about Everest Forms on our blog. For easy video tutorials, subscribe to our YouTube channel.
And if you like our content, share it on your socials. You can also reach out to us on Twitter and Facebook.






![Zakra 3.0 | Zakra Pro 2.0 Release [Major Updates!]](https://i.ytimg.com/vi/g3rifl7kWvg/maxresdefault.jpg)