
Wondering how to add date range and multiple date picker on WordPress forms? Then, this article is all you need.
As a website owner, you might need to give your users the ability to select the date range or multiple dates within a WordPress form. You can do that easily with a WordPress plugin like Everest Forms.
So, in this WPEverest article, we’ll walk you through the step-by-step process of adding date range and multiple dates with Everest Forms. Hence, keep reading!
Why Add Date Range and Multiple Dates in WordPress Forms?
WordPress forms with a date-time picker let users select a suitable date and time within a form. By default, these forms allow users to choose a single date only. But what if a user wants to select a range of dates in hotel booking forms or choose multiple dates for appointments and so on?
You should allow your users to select a preferable date range or multiple date options in such cases. And that’s why it’s necessary to integrate a date range and a multiple date picker on WordPress forms.
Having said that, it’s time to unravel the process to add WordPress forms date range and multiple date picker next.
How to Add Date Range and Multiple Dates in WordPress Forms?
Creating WordPress forms with date range and multiple date selection functionalities is super-easy if you follow the step-by-step instructions below.
Step 1: Choose a WordPress Form Builder Plugin with a Date Time Picker
Before jumping into anything else, you should first choose a WordPress form builder plugin that lets you add a date-time picker calendar.
However, you’ll have a hard time finding a form builder plugin that also lets you add date range on WordPress forms or pick multiple dates. Many of these plugins need the help of other third-party add-ons or require adding code snippets to enable this function, which isn’t everyone’s cup of tea.
And that’s why Everest Forms is our best pick.
First of all, Everest Forms is an outstanding form builder plugin that helps you build simple to complex forms like a pro. You can create great-looking contact forms, call-back forms, hotel booking forms, and more. The power to build all types of forms is at your fingertips with this plugin.
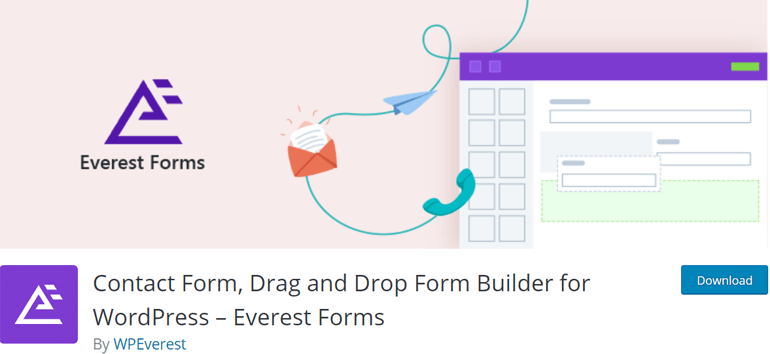
Apart from that, it lets you integrate the date field into your forms with ease, and you can fully customize it as per your need. Not to mention, adding date range on WordPress forms or a multiple date picker is a breeze with Everest forms. No need to install third-party extensions and no fuss of adding code snippets.
Besides, you can also choose the date styles, date format, and even disable specific dates. You get all these top-notch features and guess what? Everest Forms is available free of cost.
However, if you like this plugin, you can switch to its premium version anytime to take advantage of more awesome features.
Step 2: Install and Activate Everest Forms
Now that you’re sure about which WordPress plugin to use, it’s time to install the plugin. First of all, log into your WordPress dashboard and go to Plugins>>Add New.
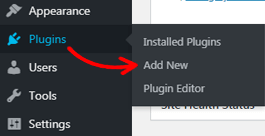
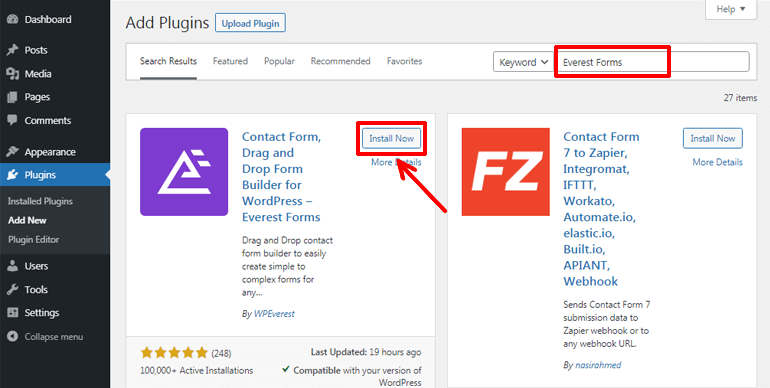
You can search and install all the free plugins available in the WordPress plugin repository from the Add Plugins page. As we’re installing Everest Forms here, you need to enter the name in the search bar at the top right. Once the plugin displays hit the Install Now button. It’ll take just a few seconds.
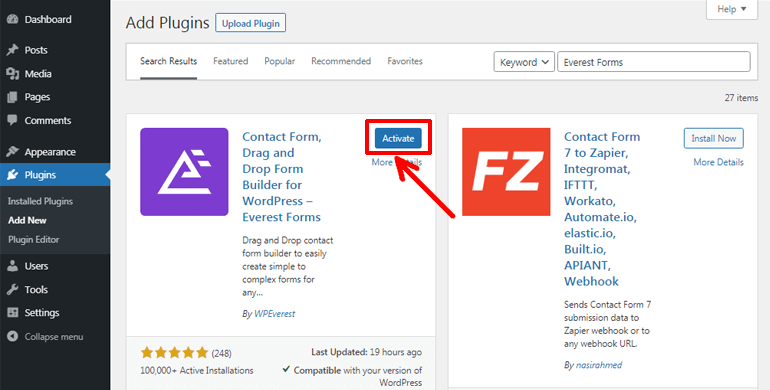
After that, you can press the Activate button to activate the plugin on your site.
Alternatively, you can visit the WordPress.org plugins page, search for the Everest Forms plugin and download it. The plugin will be downloaded as a zip file.
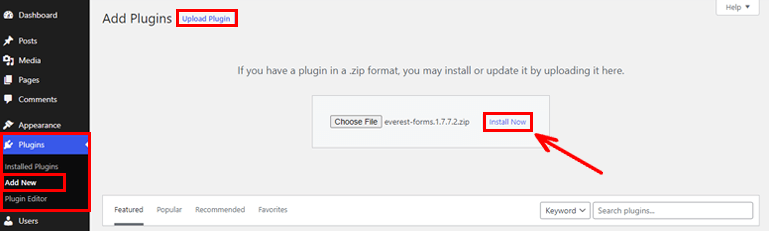
Next, from the dashboard, navigate to Plugins>>Add New. Now, on the Add Plugins page, click on the Upload Plugin button. Then, you can choose the zip file downloaded earlier and click the Install Now button. Finally, you can activate the plugin.
Step 3: Create a WordPress Form
Since you’ve successfully installed and activated the plugin, you’re all set to start your WordPress form-building journey. For this, go to Everest Forms>>Add New.
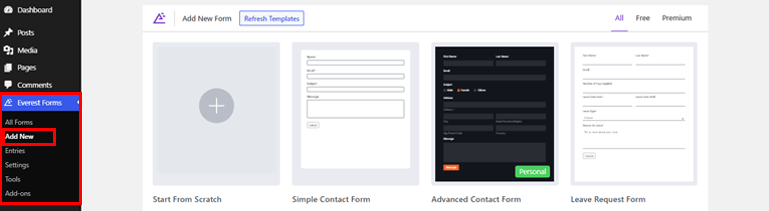
Everest Forms comes with a well-designed pre-built template library. Thus you can instantly create a form without spending much of your time. Contrarily, you can also build forms from scratch.
Since it’s a powerful drag and drop form builder plugin, either of the ways helps you create beautiful forms in no time. You can easily drag the necessary form fields from the left and drop them to the right. As easy as that!
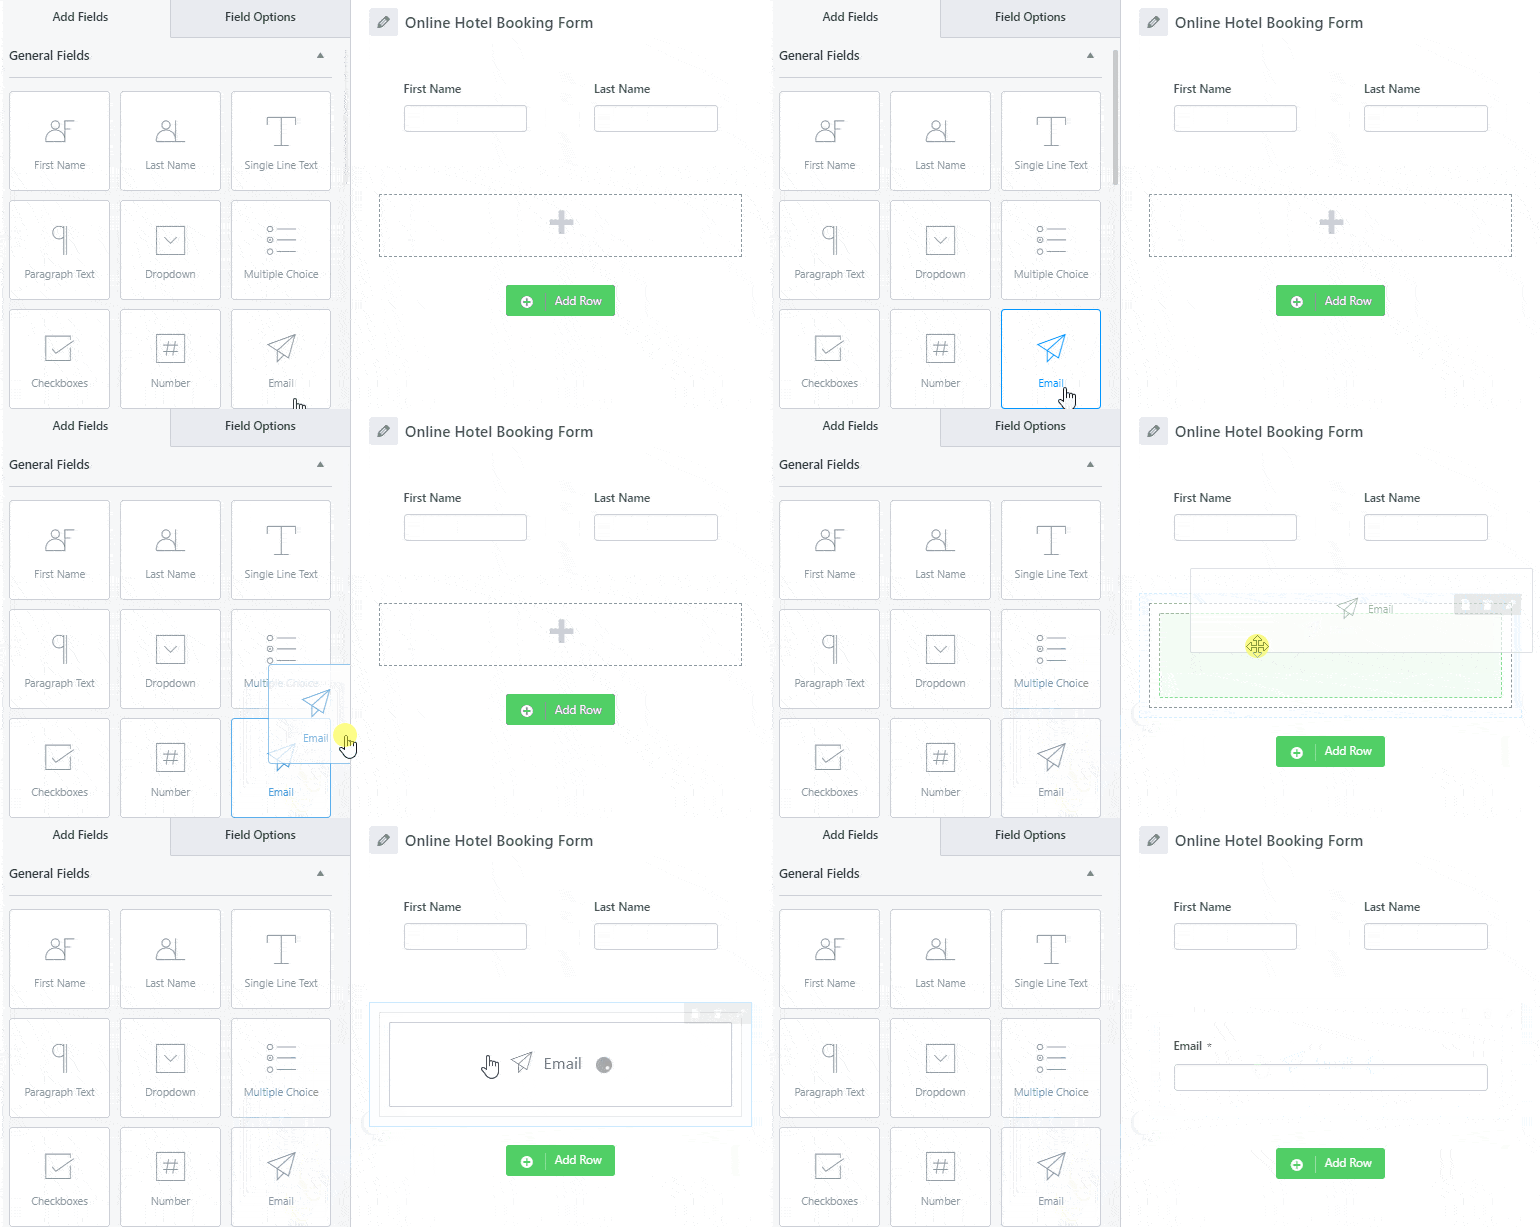
For a more detailed guide, you can go through the article on creating a contact form in WordPress.
Step 4: Add a Date Time Picker Calendar and Customize
Adding a date time picker to WordPress forms allows collecting specific dates for call-back, appointments, bookings, etc., along with other basic information from your customers.
Integrating a date-time picker is pretty easy. All you have to do is drag a Date/Time field from the Advanced Fields option like any other field and drop it to the desired area. It’s the same custom field that we’ll be converting into a date range or multiple date picker later.
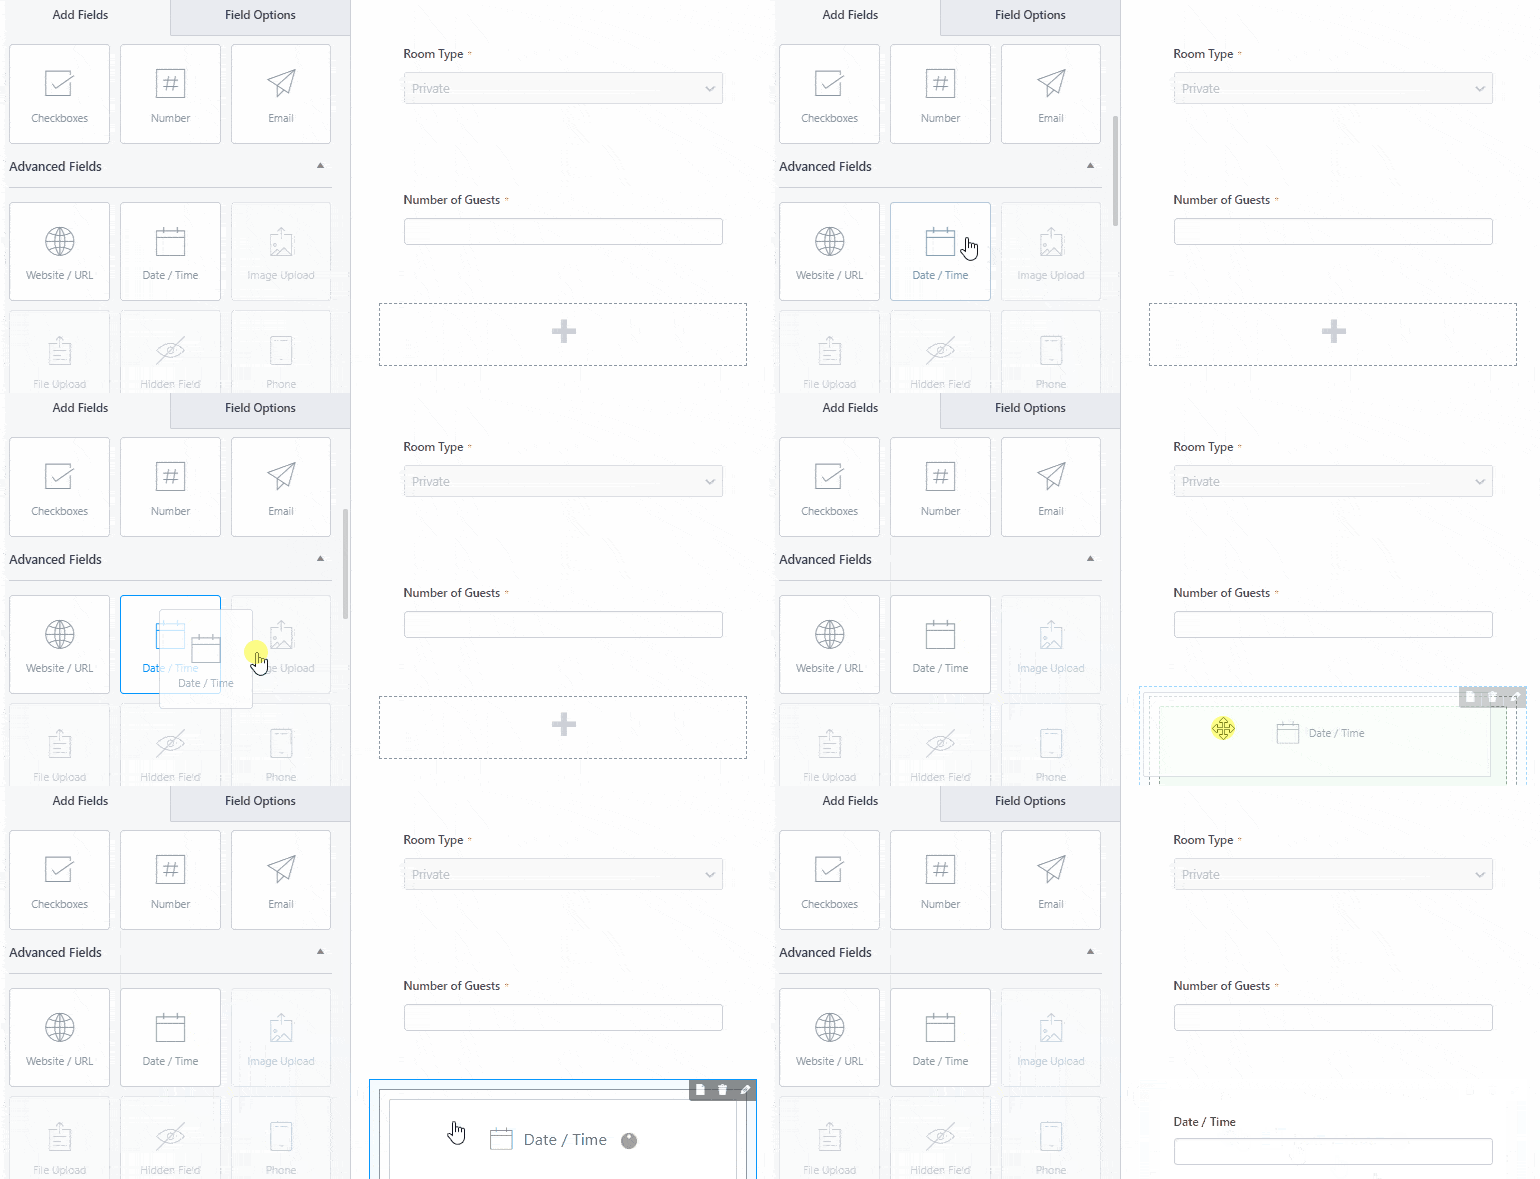
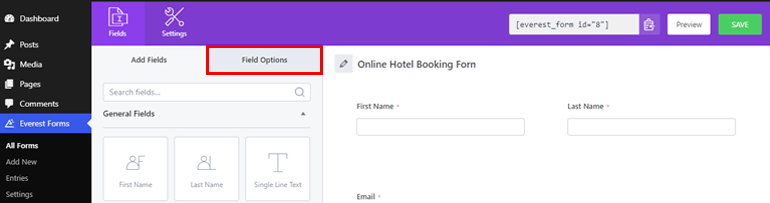
Further, you can click on the Field Options at the top to customize the individual form field. From here, you can edit the label, description, and other advanced options of your form fields.
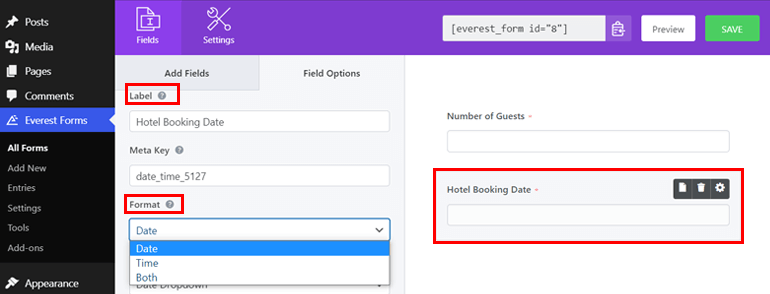
Similarly, clicking on the date/time field allows you to change its label and format. There are three date formats. Choosing a Date lets users select the appropriate date only. Likewise, choosing Time allows selection of time only, and Both options permit selection of both the date and time.
Moreover, you can choose from two date styles: Date Picker (calendar style date menu) and Date Dropdown (dropdown selector).
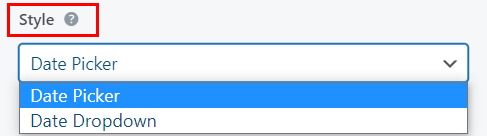
However, you should know that only the Date Picker style is integrated with the advanced functionality for a date range and multiple date selection. Whereas the Date Dropdown style limits choosing a single date.
Therefore, you ought to choose the Date Picker for adding date range and multiple date picker on your WordPress forms.
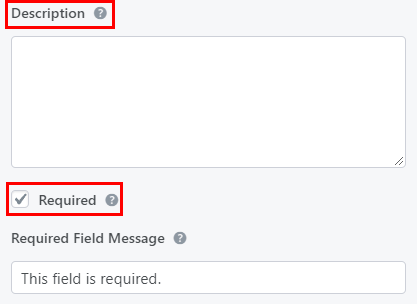
Besides, you can add a description and make a field required. Checkmarking field as required makes it a compulsion for your users to fill the particular field to proceed further with the form.
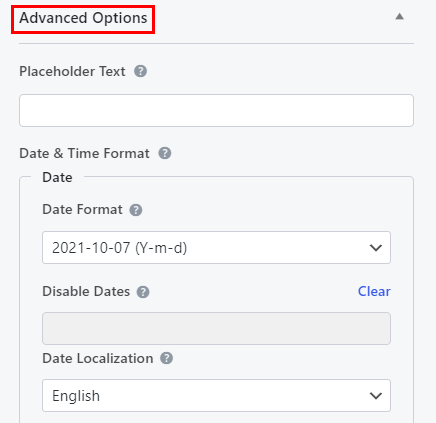
Further, you can add placeholder text, change date formats, disable or limit certain date selections, and do more from the Advanced Options.
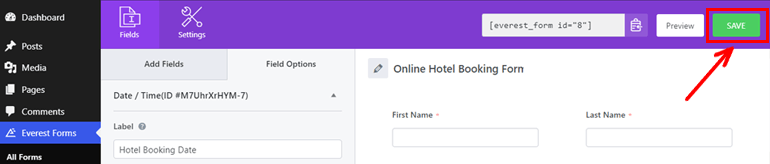
Also, don’t forget to click on the SAVE button once you complete making necessary changes.
Step 5: Add Date Range on WordPress Forms
Now, let’s get into the real business i.e., adding WordPress forms date range. If you have a resort, hotel, or other such booking forms, your client may want to select the start date and end date for reservations.
In such instances, the date range in WordPress forms comes in handy. It allows one to choose the date range efficiently and also provides a better user experience. So, if you don’t know how to add WordPress forms date range. Here’s how it’s done.
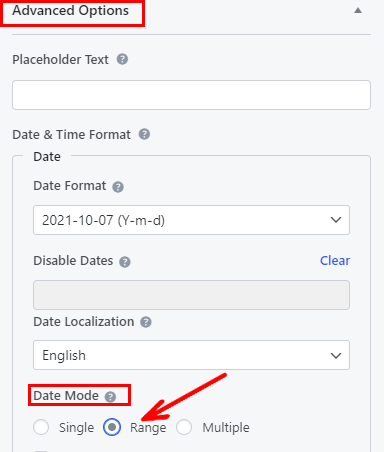
A date range in forms can be integrated from the same Advanced Options under the Field Options tab. All you need to do is switch the Date Mode option to Range, and you’re done. Easy-peasy, isn’t it?
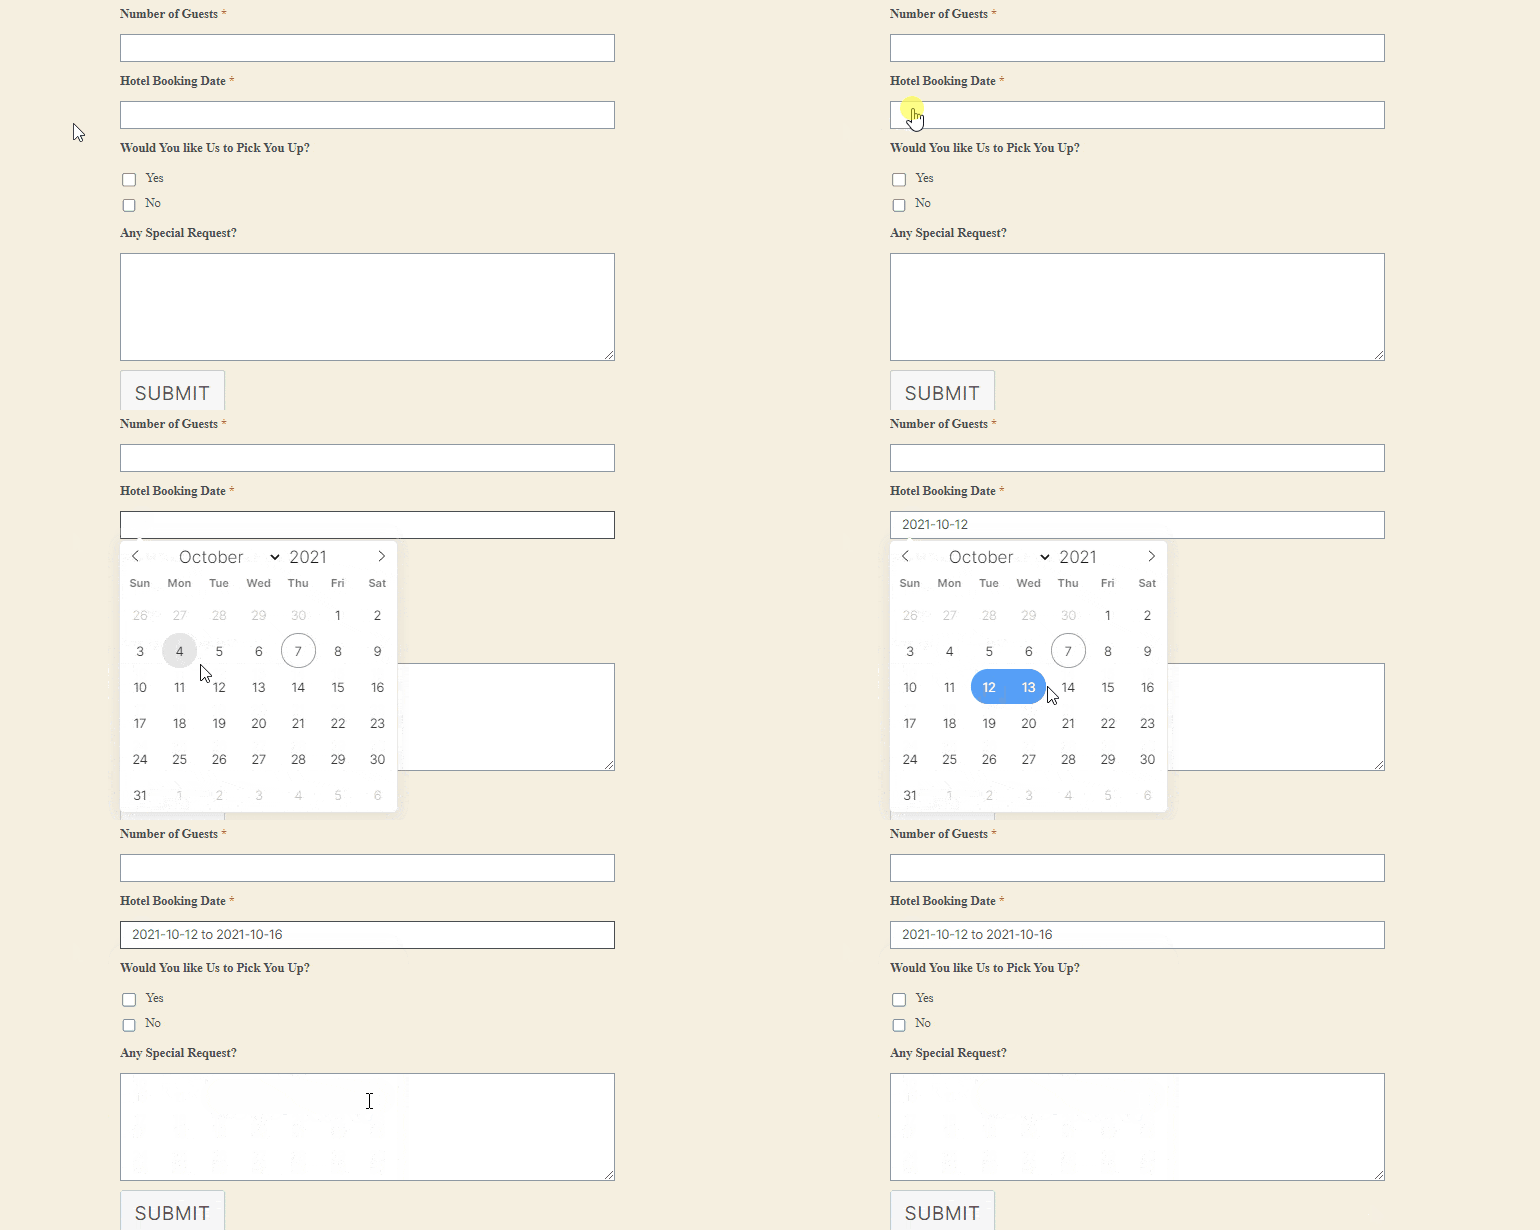
Now, if you click on the Preview button at the top right corner of your form, your date field appears just like a text box. However, if you click on this field, it should now allow you to select a preferable date range, as shown in the image given below.
Step 6: Add Multiple Dates on WordPress Forms
For various forms like medical appointments, leave request forms, etc., you may want to add multiple date pickers rather than a date range. So, the next step in our tutorial is to add multiple dates on WordPress forms.
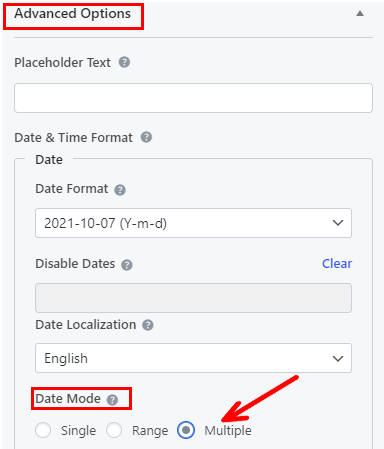
The integration of a multiple date picker is no different from adding date range on WordPress forms. You just need to select Multiple as the Date Mode instead of Range from the Advanced Options section. And the multiple date option is added in a snap of the fingers.
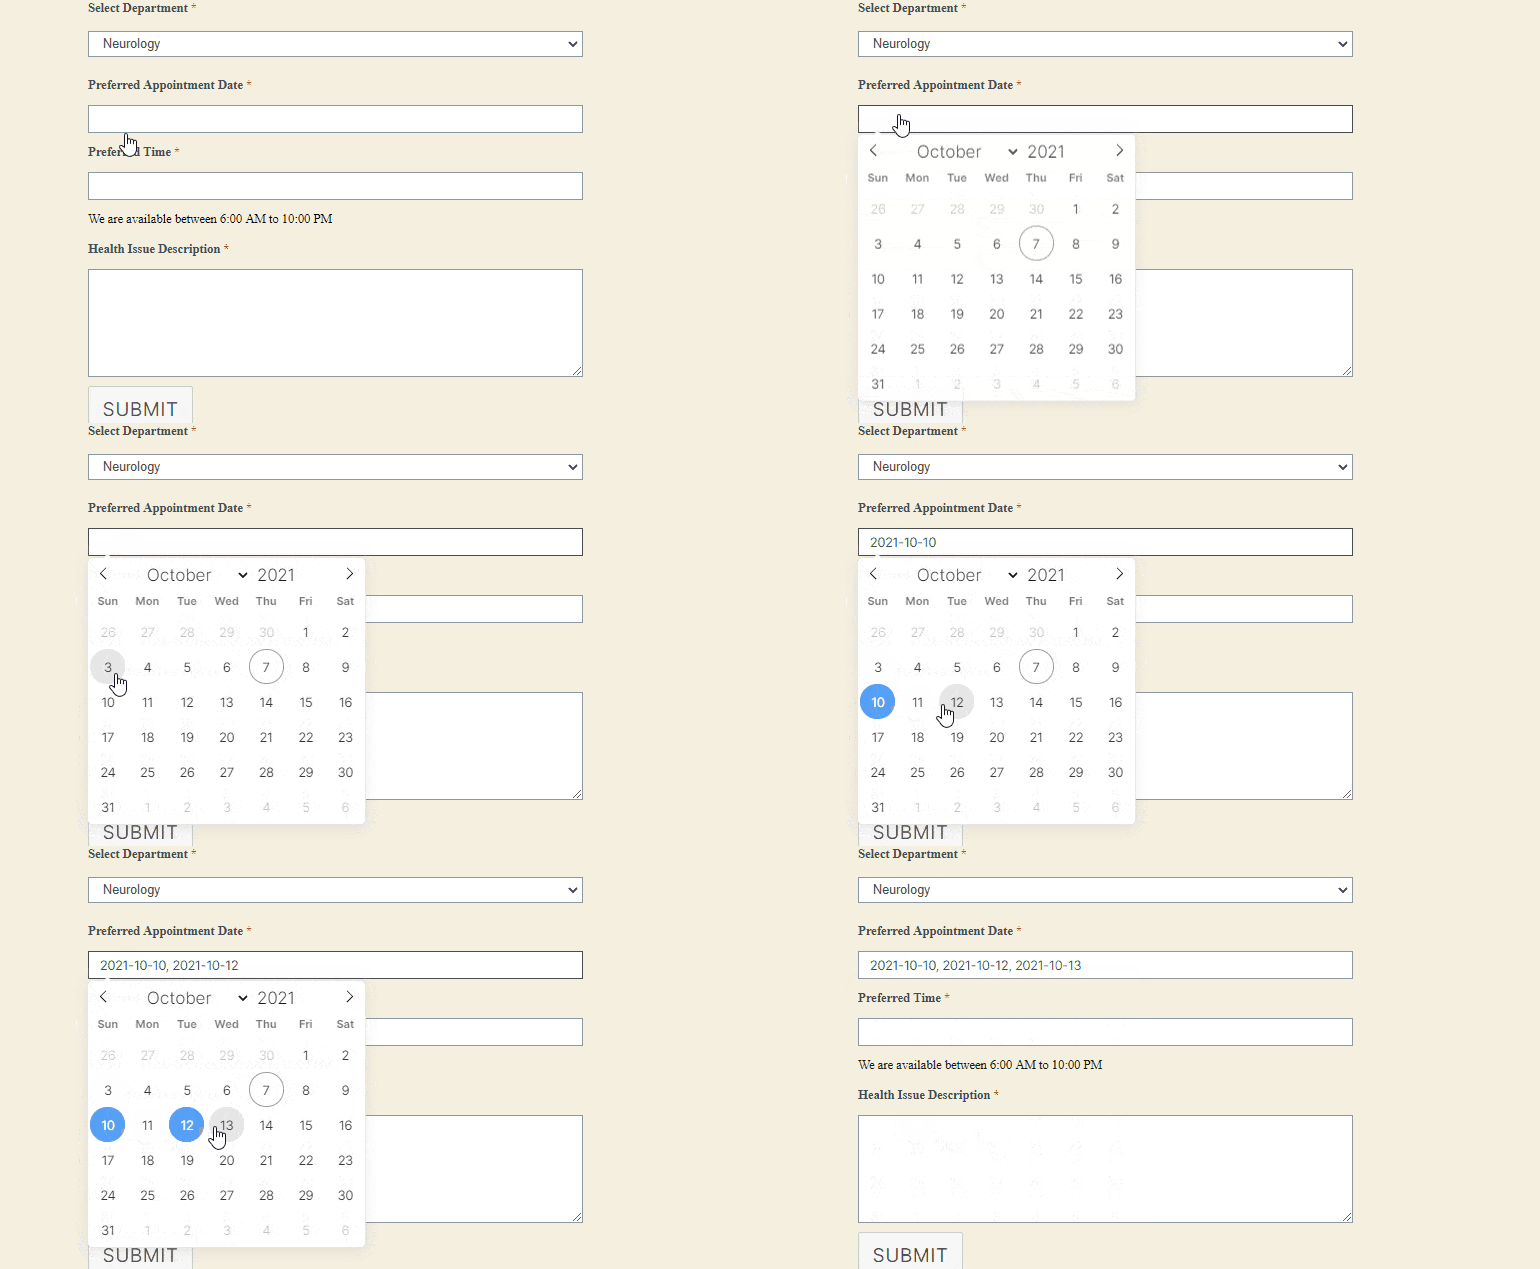
Next, click on the Preview button to check your date field. Clicking on the date field will allow you to pick multiple dates now.
Step 7: Customize the Form Settings
To make your form ready to publish, you must customize the general form and email notification settings. So, let’s briefly discuss how you can configure the settings of your WordPress forms.
Configure General Form Settings
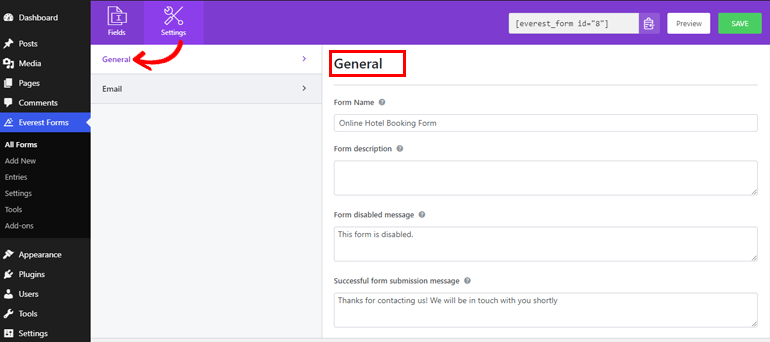
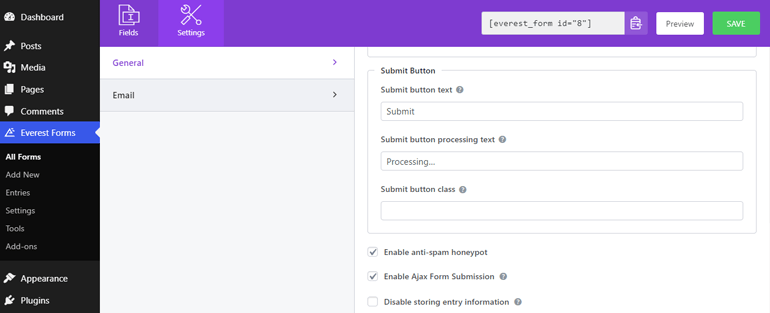
You can navigate to Settings>>General to configure all the basic settings of your form. Basic settings refer to providing form name, short description, form disabled message, and a successful form submission message.
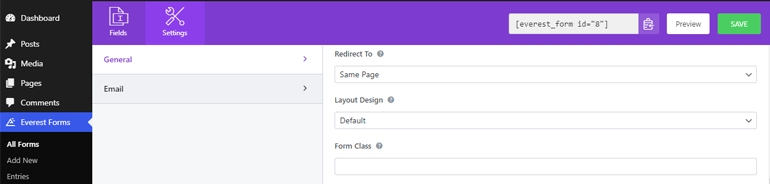
Additionally, you can choose the desired page or external URL to redirect your users after form submission. Also, there are two layout designs that you can choose from. It also allows you to enter the CSS class for the form.
Besides, it’s also possible to add suitable button text, submit button processing text, and submit button class to match your style. Furthermore, there’s an option for enabling or disabling anti-spam honeypot, ajax form submission, and entry information storage.
Configure Email Notifications
To configure the email notifications, go to Settings>>Email. You can easily set the to and from email addresses from here. Likewise, it also allows you to add email subjects and messages.
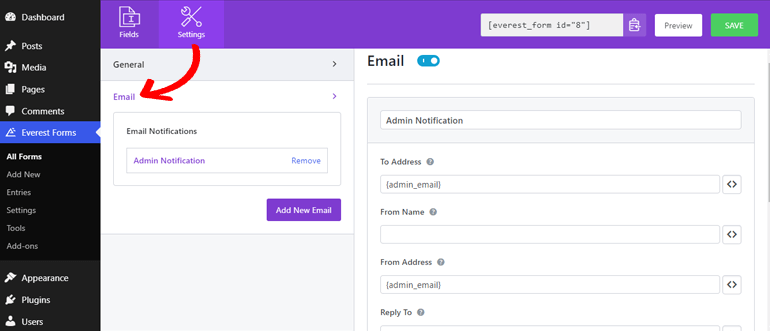
One of the perks of using Everest Forms is that it permits unlimited email notification settings.
For instance, admin email notification and user email notification. Admin email notification is sent to admin whenever a user submits the form. Whereas a user notification is triggered to the users to let them know that their form has been received.
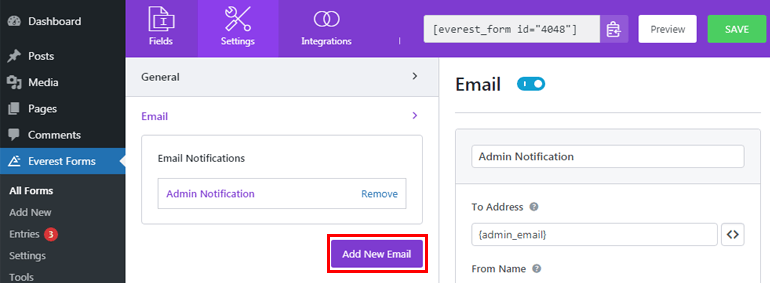
Admin email is set by default. However, it’s better if you check the setting by yourself to avoid issues during mail delivery. Similarly, you can press the Add New Email button to set the user notification.
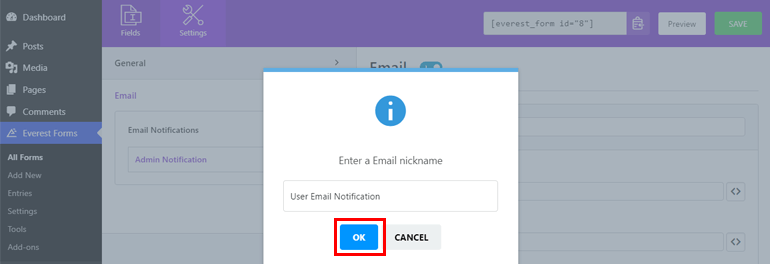
Now, you can provide a nickname to your new email, click on the OK button, and proceed to set the user email notification.
Step 8: Publish Your WordPress Form with Date Time Picker
Since your WordPress form is all set, you can now publish it to make your form go live on your site. With Everest Forms, you can add forms to the posts, pages, or anywhere on your WordPress website.
Here we’ll add the forms to the posts. So, from your dashboard, go to Posts>>Add New.
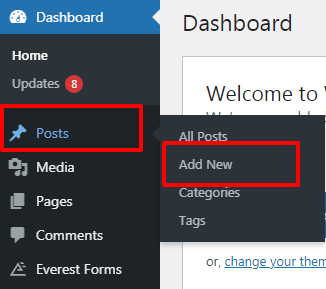
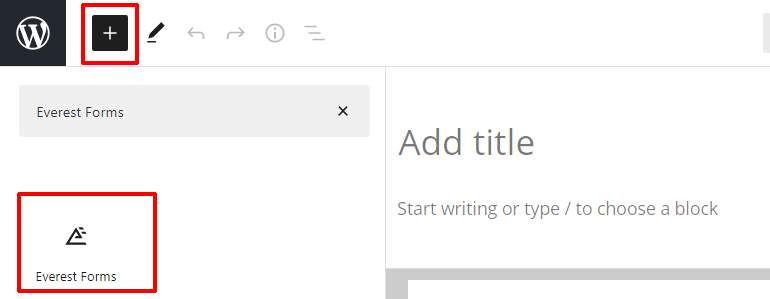
Now, find the add block (+) button at the top and click it. Again, search the Everest Forms block and press it.
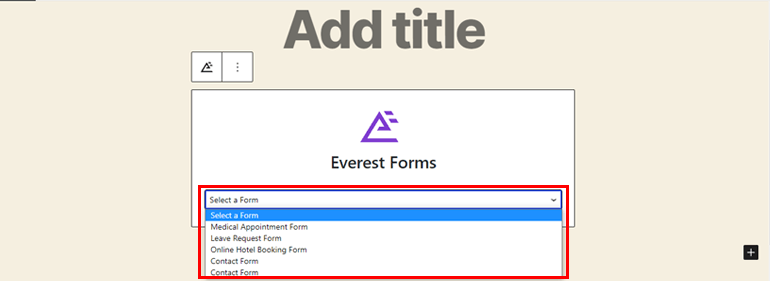
After that, you can select the desired form from dropdown menus.
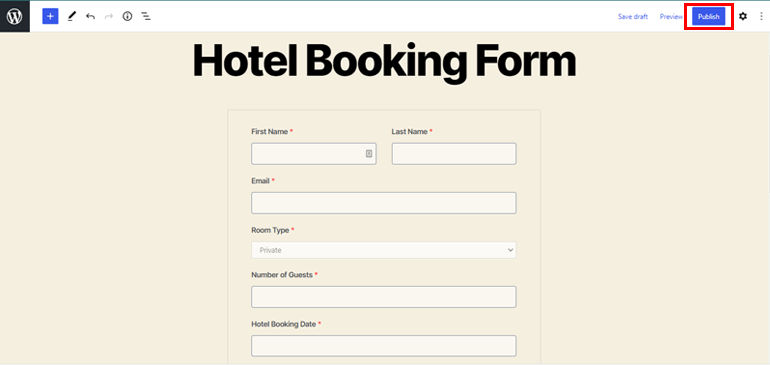
Finally, you can give a suitable title to your form and hit the Publish button to see your form in action.
Conclusion
So, this is how you add WordPress forms date range, and multiple date picker. With a fantastic form builder plugin like Everest Forms, it’s super easy. This plugin avoids adding other extensions and messing with code to add date range on WordPress forms or to pick multiple dates.
And that wraps up our article for now. We hope you enjoyed reading it. If you did, make sure you share it on your social platforms.
For more WordPress-related posts valuable to any WordPress website owner, do visit our blog. You can start with our articles on cheap domain registrar companies and WooCommerce hosting services to ensure you’re using the best domain and hosting services in the market for your website.
Lastly, don’t forget to follow us on Twitter and Facebook for the latest articles update.






![Zakra 3.0 | Zakra Pro 2.0 Release [Major Updates!]](https://i.ytimg.com/vi/g3rifl7kWvg/maxresdefault.jpg)