Do you want to know how to create a newsletter signup form on your WordPress website? Take a seat. We got you.
To put it simply, Newsletter Signup forms are the forms with which visitors can provide emails to the website admins. And the website admins will provide regular updates about products through that email. A newsletter signup form is a very effective way to grow or sustain your business through email marketing.
In this article, we plan to show you all the steps involved in creating a newsletter signup form. So read on for the ultimate guide on How to Create a Newsletter Signup form on WordPress.
Why Do You Need a Newsletter Signup Form on Your Website?
Newsletter Signup forms are one of the most reliable ways of extending your business. They not only help you grow your website visitors but also make sure that your existing users won’t leave.
A newsletter will do many things for your website. And here are some of the major benefits of creating a Newsletter Signup Form.
- Keep your visitors updated: With a newsletter, you can easily send emails to many people about your content. This will make sure that your traffic is secure and makes your visitors more regular.
- Find new subscribers: When you create a signup form on your WordPress website, people can easily subscribe to your content. This will make it easier to find new visitors with similar interests.
- Grow your presence on Social Media: While sending emails to your visitors, you can include a social sharing button. This will allow your visitors to easily share your content on social media. Hence, increasing your social media presence.
- Drive targeted traffic: You target the visitors that have an interest in your content when you create a signup form in WordPress. This drives specific and regular web traffic to your website.
- Increase monetization: You can keep the list of the subscribers of your website through your newsletter. With this, you can be confident that the advertisers will have an interest in your website when you have a solid list of subscribers.
How to Create a Newsletter Signup Form in WordPress?
Before we start, let’s first look at the things we need. We will need the top form builder plugin in the market. And, for exactly that reason, we chose Everest Forms. It is an easy to use drag and drop form builder that can easily create a form for you.
And the next thing we need is a platform to manage our subscribers. And MailChimp is one of the best platforms for managing subscriber lists.
Step-1: Installing Everest Forms
Now we sorted that out. And the first step is to install the plugin, Everest Forms.
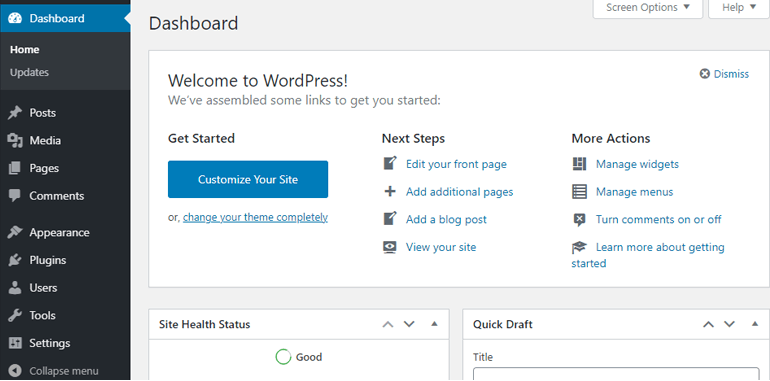
Firstly, log in to your WordPress dashboard.
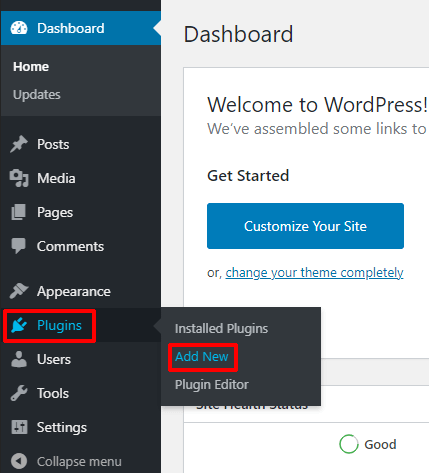
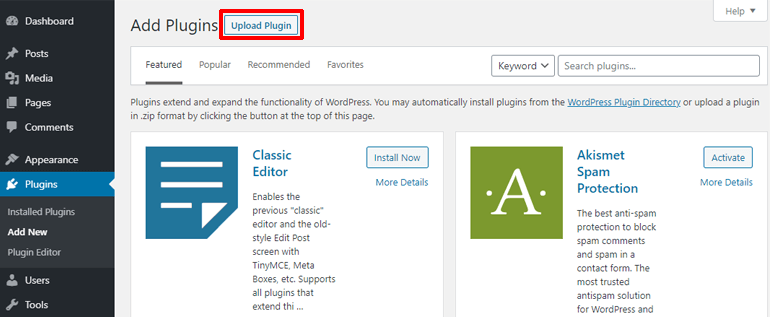
Then, go to Plugins >> Add New to add a new plugin.
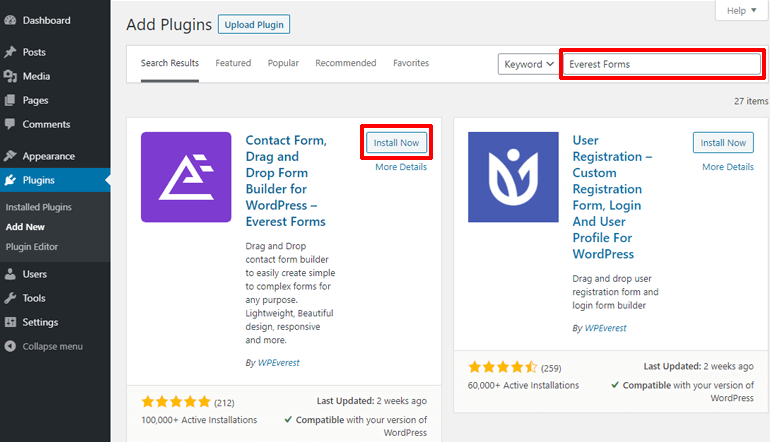
This will take you to the WordPress repository of plugins. In there, you’ll see a search box on the right. Type Everest Forms in the search box. Soon as you type Everest Forms, you’ll see the Everest Forms panel. In that panel, click on Install.
After installing, click on Activate on the same panel to activate Everest Forms.
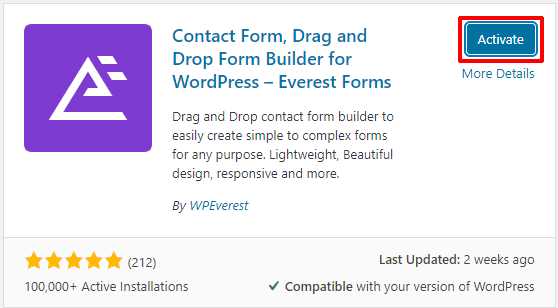
Done! Everest Forms has been installed and activated on your website.
Step-2: Getting Everest Forms Pro and MailChimp Add-on
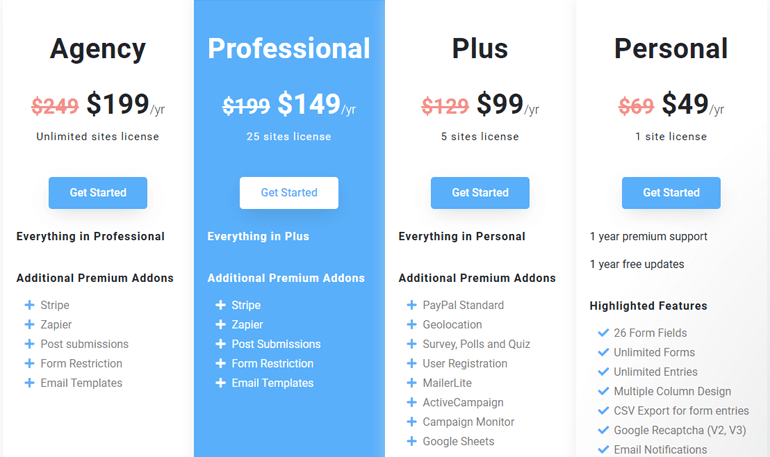
Everest Forms is a powerful form builder. The free version has all the functionalities to create a form for your website. But for functionalities like integrating Everest Forms with other online applications, you need a paid plan.
So, head over to Everest Forms pricing page and choose a plan.
When you check out with a plan, you will also create a WPEverest account. In your WPEverest account, you will have all the plugins and add-ons that come with your plan.
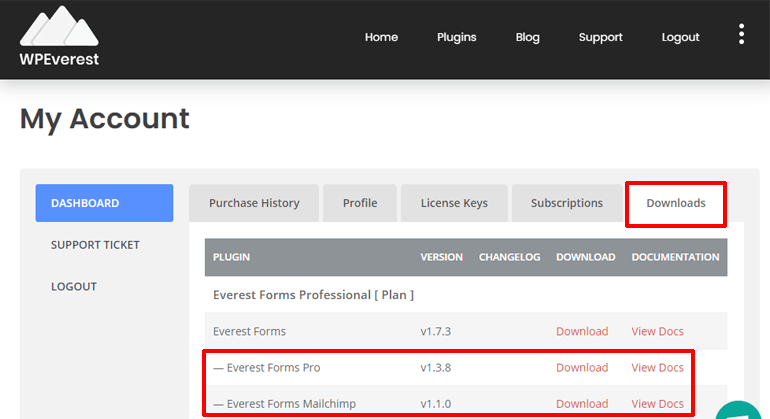
Now, go to your account page.
On your account page, click on Downloads, to access all your add-ons and plugins. Download Everest Forms pro plugin and Everest Forms MailChimp add-on.
You’ll also need the license key for the pro version of Everest Forms. So, head over to the License Keys tab.
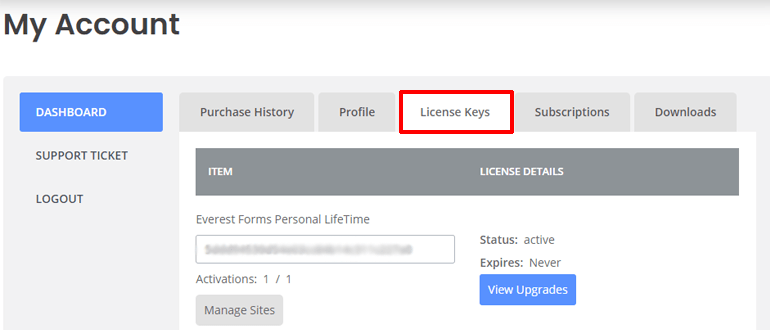
Under the License Keys tab, you’ll see license keys for the version of Everest Forms you’ve purchased. Copy the license key.
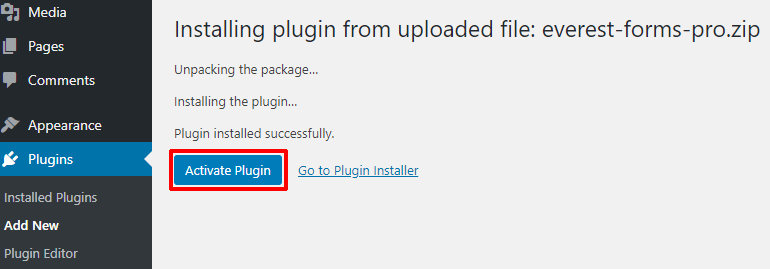
After that, head over to your WordPress Dashboard. And from there go to Plugins >> Add New.
Then, on the top of the page, click on the Upload Plugin button to upload the plugin you just downloaded.
Now, drag the Everest Forms pro plugin and drop it there. After that hit the Install Now button.

WordPress will start uploading and installing your plugin. Once installed, you’ll see the Activate button. Click on the Activate button to activate the plugin.
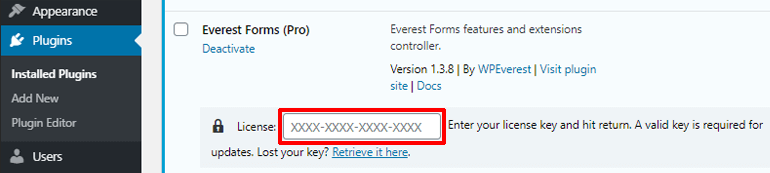
This will activate your plugin and you’ll be redirected to the plugins page of your WordPress Dashboard. There, under Everest Forms Pro, you’ll see a field to enter the license key. Paste the license key there and hit Return.
You have successfully installed the pro version of Everest Forms. You can install the MailChimp add-on following the same process.
And if you want to customize your form in the WordPress Customizer Interface, you can also download the Style Customizer add-on. The Style Customizer add-on will be required if you want to customize a premium template in Everest Forms.
Step-3: Setting Up MailChimp Integration
Before we can show you how we can create a Newsletter signup form in WordPress, we also need MailChimp to manage our subscriber list. So, head over to your MailChimp Dashboard.
If you don’t already have a MailChimp account, then you need to create one. It’s one of the must-have web-applications for online businesses.
Creating a MailChimp Account
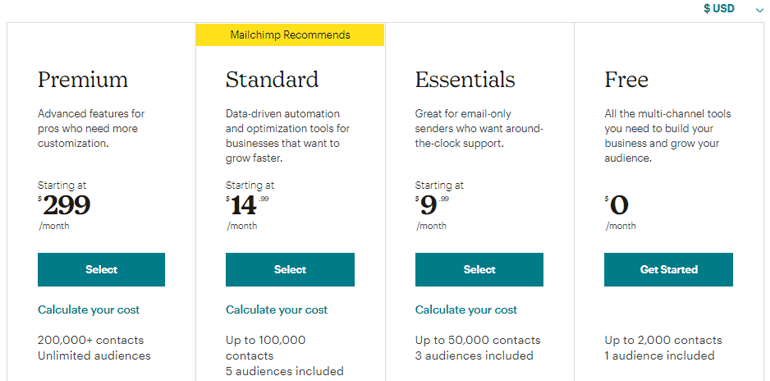
To create a MailChimp account, head over to MailChimp.com. If you want to start with a premium plan, click on the Pick a Plan button.

This will take you to the pricing page. In there, choose a plan and hit Select.
You will now be asked for a username, email, and password. Fill them up and hit Sign Up.
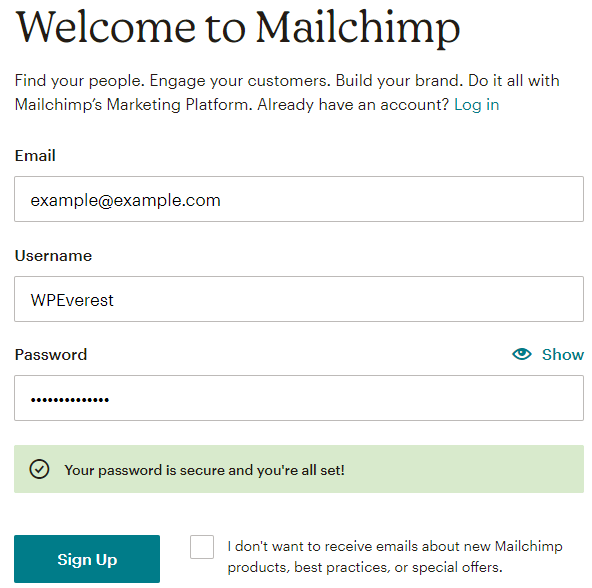
This will take you to the page where you have to choose a username, fill email, and password. Once done, MailChimp will ask about your business and payment details (for a paid plan). And, after you finish filling out your business and personal info, MailChimp will create an account for you.
Creating Audience List in MailChimp
And, before we can integrate MailChimp with Everest Forms, we need an audience list in our MailChimp account.
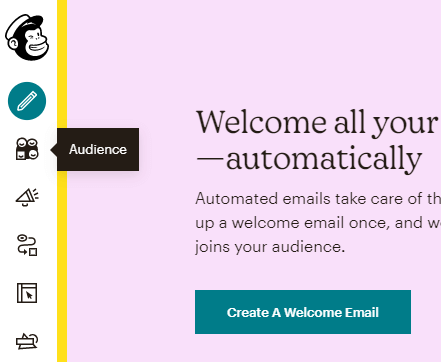
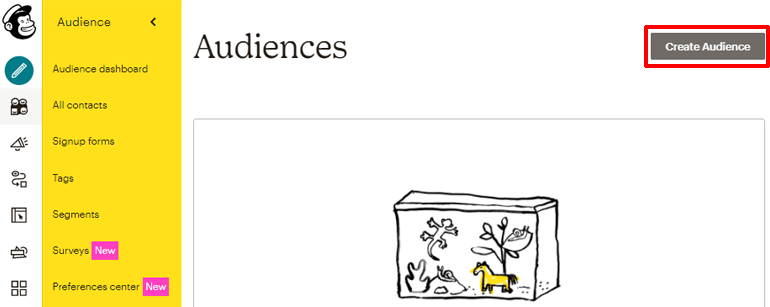
So, go ahead and create an audience list on your MailChimp account. To do that, click on the Audience icon on MailChimp Dashboard Menu.
This will take you to your audience lists. If you already have an audience list, you’ll see the number of subscribers and contacts in your audience dashboard.
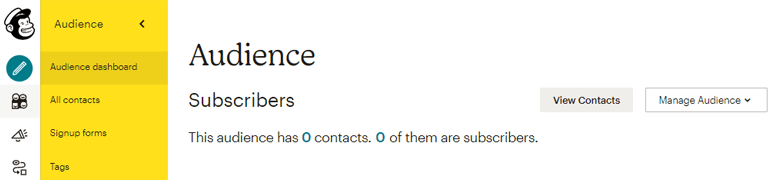
If you don’t already have an audience list, click on the Create Audience button to create one.
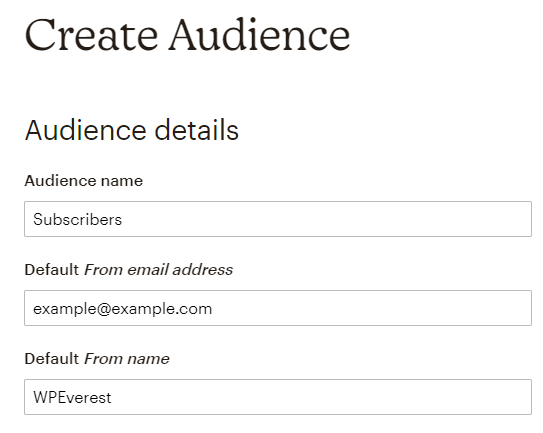
Then, fill up the required fields, check the settings, and hit Save.
Your audience list is created.
Getting the API key
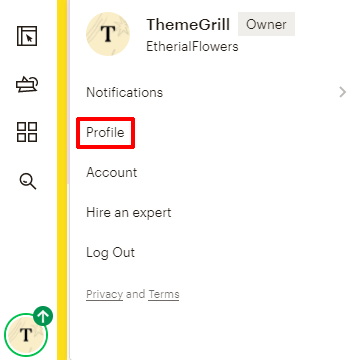
Once you have an audience list, click on the icon with your profile image on the bottom of the MailChimp menu. If you haven’t added a profile image, then there should be the first letter of your name. This button is mainly for managing your account or logging out.

After you click on your icon, a menu will show up, in that menu click on Profile.
This will take you to your profile editing page. On that page, click on Extras. Three different options will dropdown. Out of those options click on API keys.
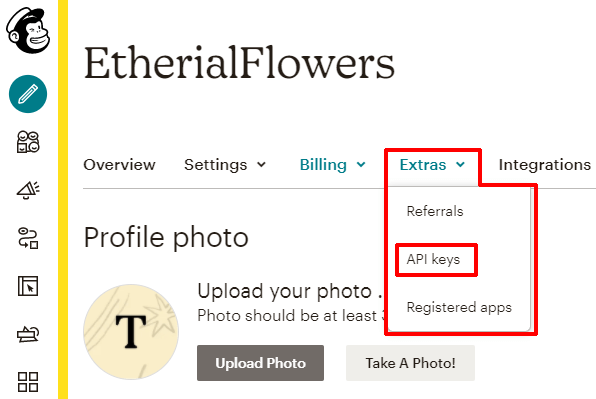
You’ll be taken to the page which holds your API keys. We are going to use an API key to connect MailChimp with Everest Forms.
Scroll down and you should see your API keys.
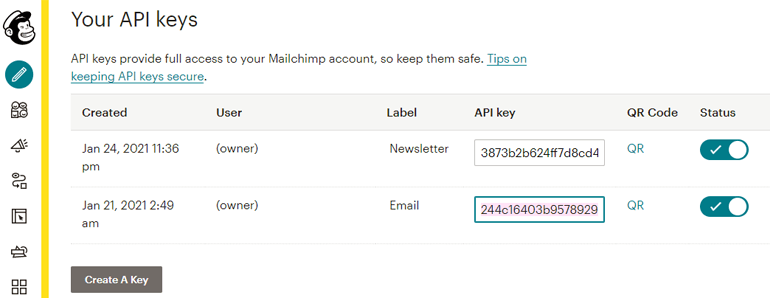
Now copy that key and we’re done. Now, all we need to do is paste this key in Everest Forms to connect these two amazing platforms.
Step-4: Creating the Newsletter Signup forms in Everest Forms
We had to set up a few things before we could start creating our Newsletter Signup Form. And now that’s done, so let’s start building our form.
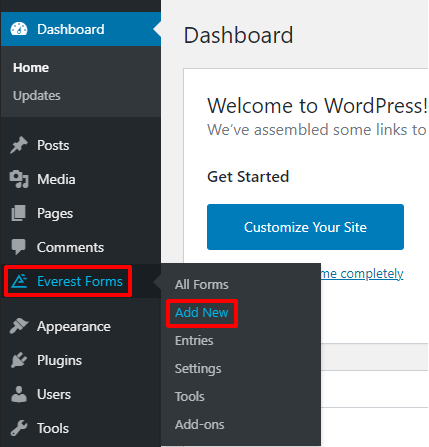
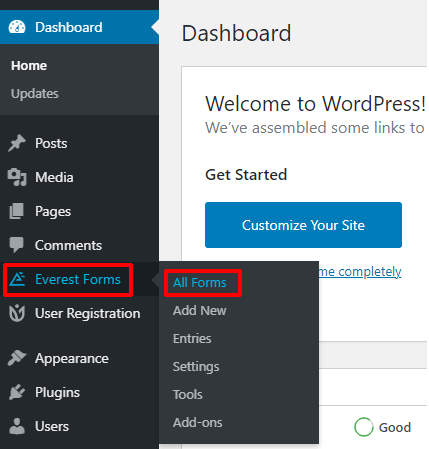
In your WordPress Dashboard, go to Everest Forms >> Add New.
This will bring you to the templates repository of Everest Forms. There are over a dozen templates for different kinds of forms. And, if you want to create your unique form, you have the option to start a form from scratch.

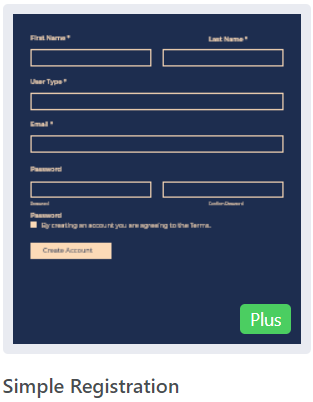
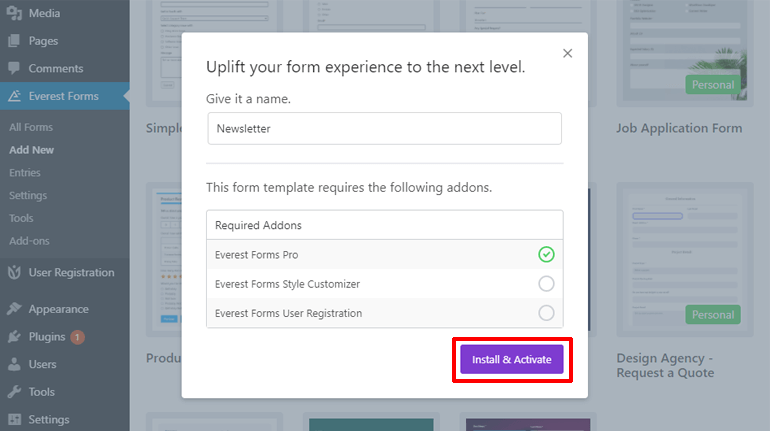
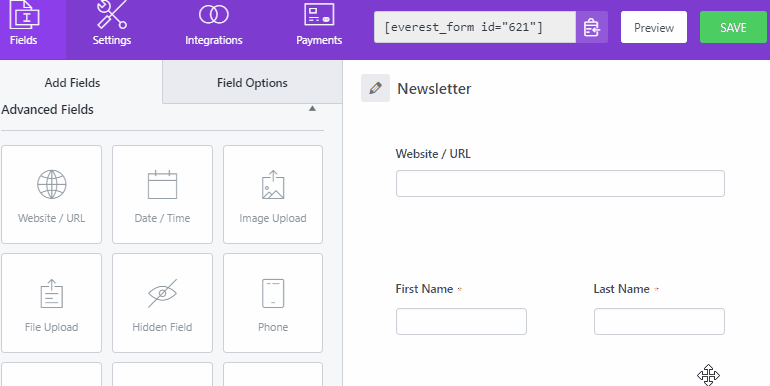
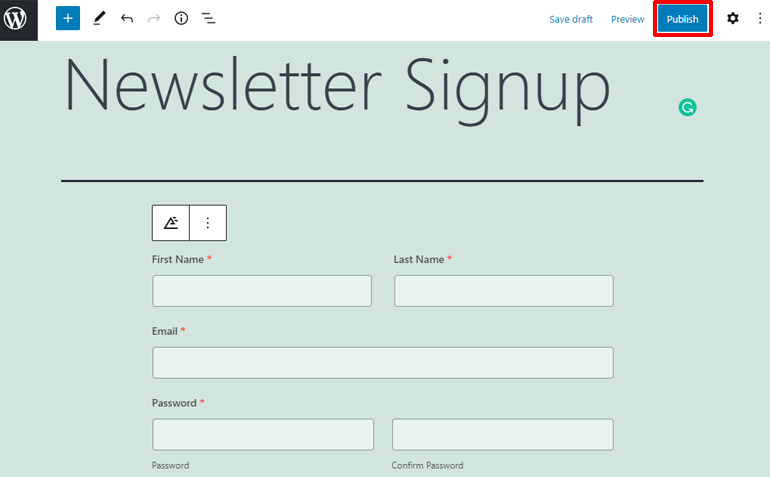
If you want your Newsletter signup form to be detailed, you can go with the Simple Registration Template. It looks something like this:
This template requires you to have the Style Customizer and User Registration add-ons of Everest Forms.
But, If you want a newsletter signup form that just retrieves an email address, then you can create your form with a single field.
For now, let’s go with the template since that saves time. And besides, we can always customize the template to our liking.
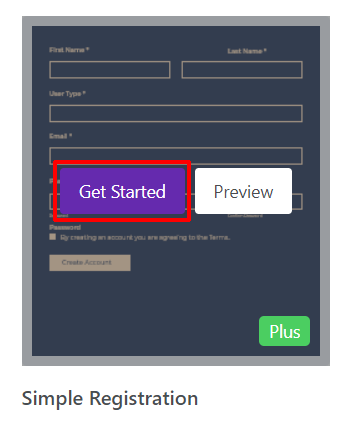
Hover over the template and click on Get Started.
You’ll be asked to put a name on your form. Enter a Name. You’ll see a list of add-ons that need to be installed. But don’t worry, you won’t have to install them manually. If you hit Install and Activate, then Everest Forms will automatically install them for you.
After the plugins are installed, simply hit Continue to go to the next window.
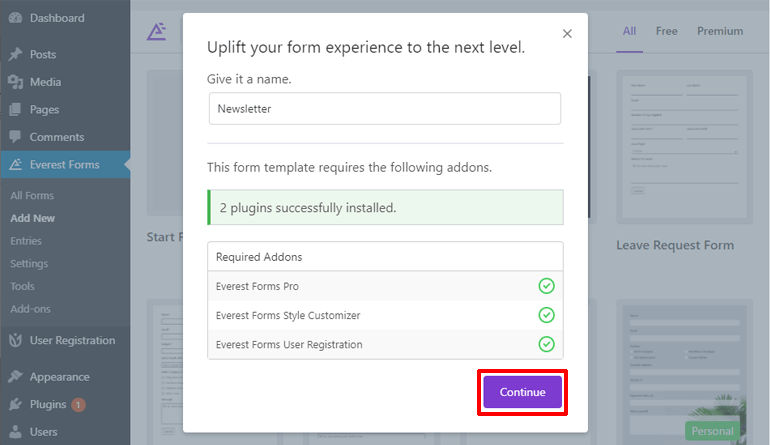
And that’s it. Your form has been created.
Step-5: Customizing Your Newsletter Signup Form
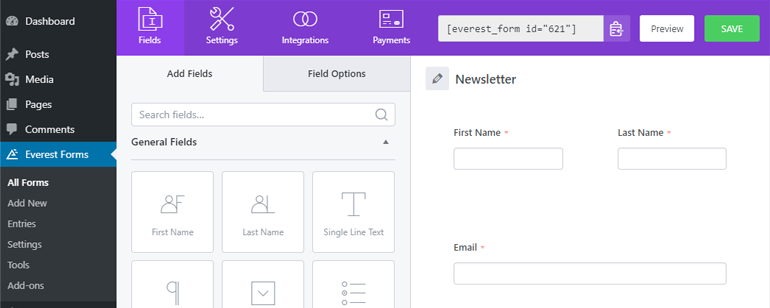
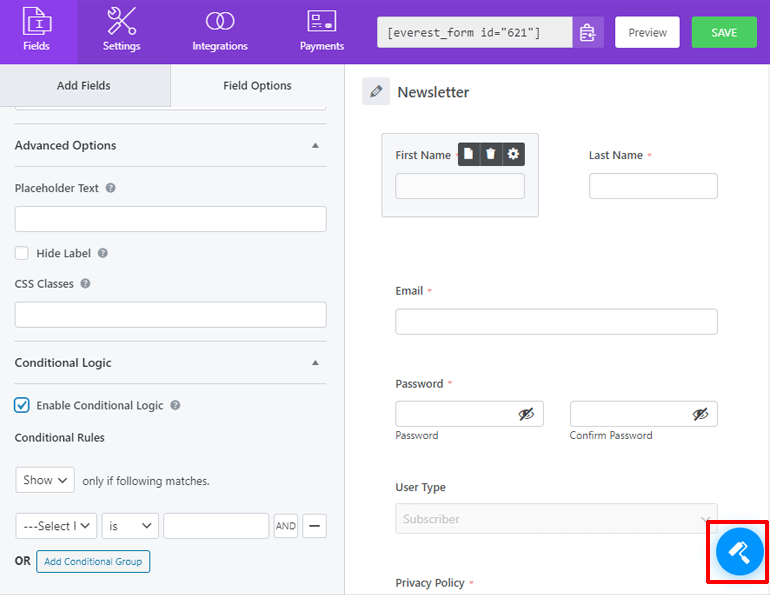
Our form has been created. And if you like the template, you can just hit Save to save the form. And continue with other steps. But if you want to customize the form, Everest Forms offers an easy interface for that too.
In the form editor window of Everest Forms, you can see two sections. The left one contains all the fields for your form. While the right section is for adding and managing the fields.
To add a row in the form, click on the Add Row button.
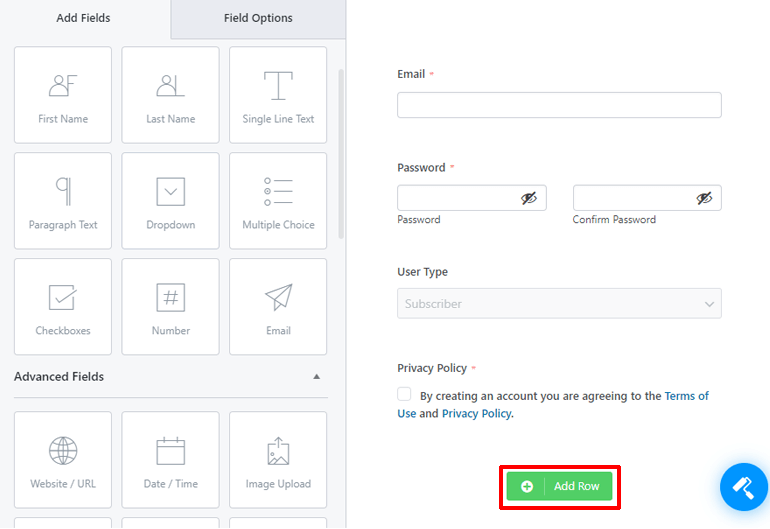
And to insert a field in the form, just drag and drop the field in the desired location.
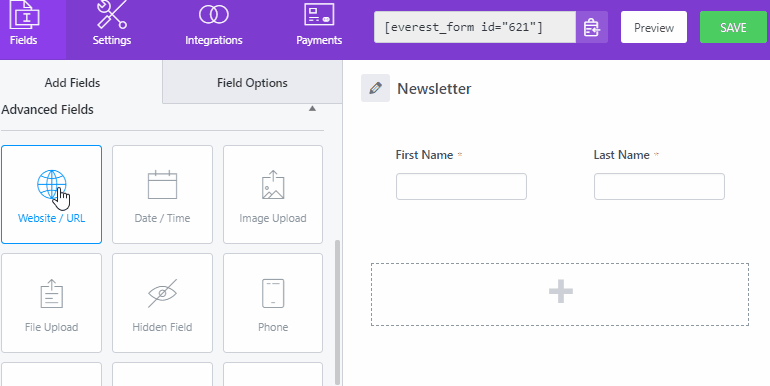
To rearrange a field or a row, simply and drag it and drop it in a location you want.
Note: When you hover over a field, you’ll see an inner line and an outer line surrounding a field. The inner one represents the field while the outer line represents the row.
Once you’re done, hit the Save button on the top right corner to save your form.
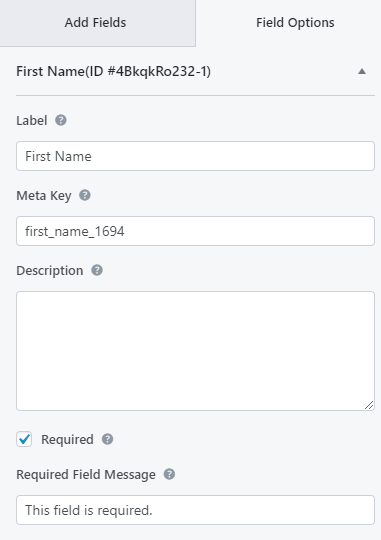
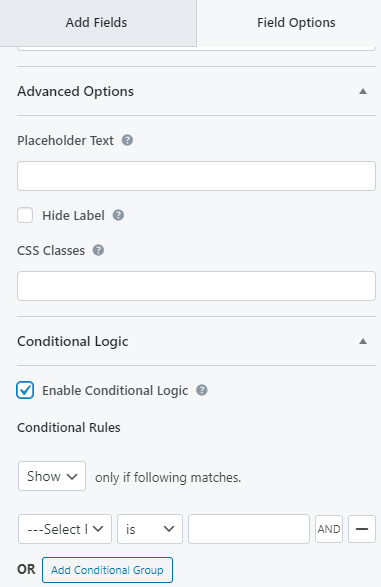
Customizing Field Options
In Everest Forms, you can completely change a field’s properties. And that is done through the Field Options tab on the left section of your form editor.
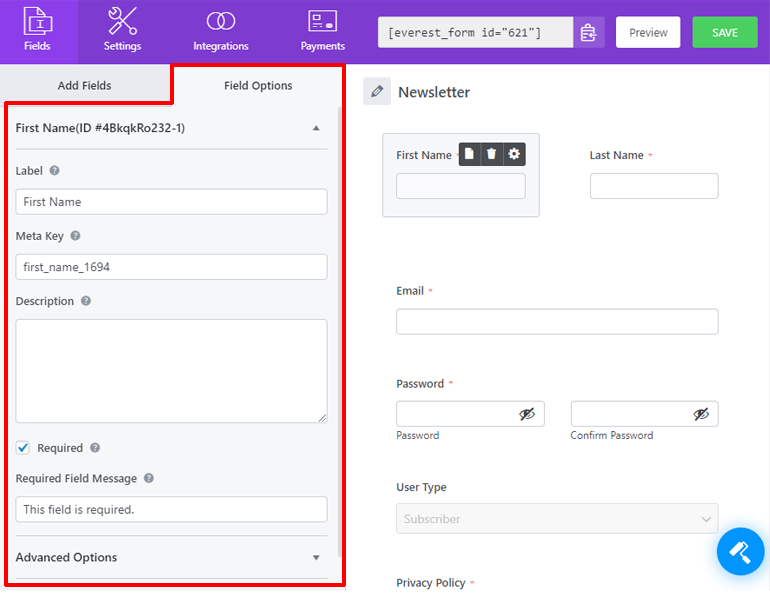
To edit the field options of a specific field, click on the field you want and then click on the Field Options tab.
Inside the field options tab, you’ll see different options for the field. The most common field options are the label of the field, description, required checkbox, field message, placeholder text, CSS, and conditional logic.
The label option contains the name of your field. And in the description, you can add text to describe your field. Visitors will see this text below your field.
The Required checkbox makes the field mandatory. Visitors won’t be able to submit the form without filling the particular field. Under the Required Field Message option, you can choose what text will appear when the visitor tries to submit without filling up the field.
The Placeholder text occupies your field temporarily until the visitors give their input. You can also add custom CSS through the CSS option.
And lastly, the Conditional Logic applies a specific condition to your field. You can choose to show or hide a field only when another is filled or checked.
Besides these, different fields have their unique field options. Feel free to check them out while creating your signup form in WordPress.
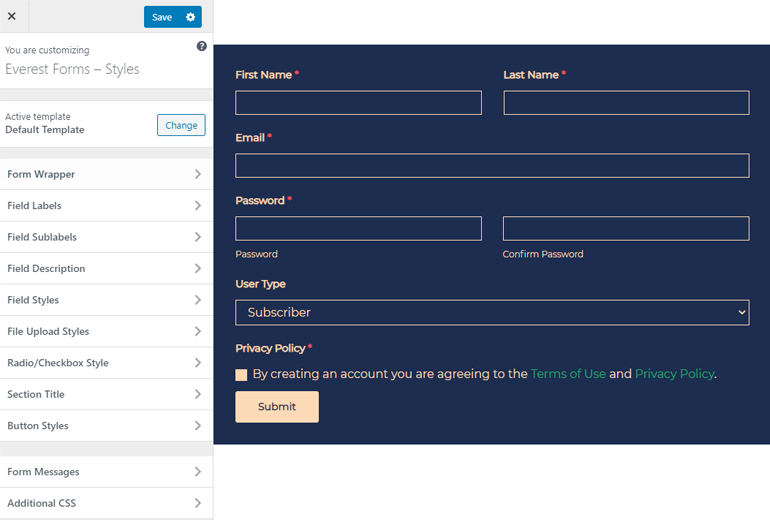
Customizing Your Form’s Appearance
If you want to customize the look of your form, you can click on the blue icon on the bottom right corner of the window.
This will take you to the WordPress Customizer interface. There you’ll have the options to customize your form’s styles, borders, button styles, colors, and more. All that can be done while previewing the changes in real-time.
Once you’re done customizing the look of your form, hit the Save button on the top of the customizer menu to save your form.
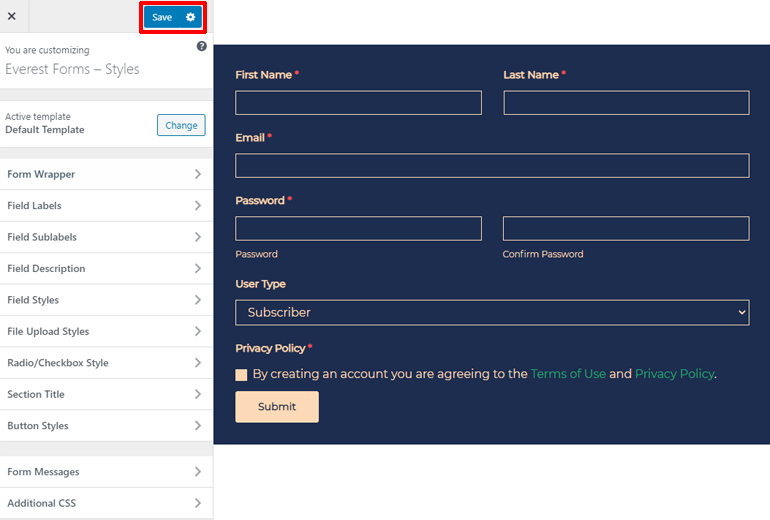
Wasn’t that easy? That’s because it was the WordPress Customizer.
Step-6: Adding the Newsletter Signup Form to a Page
We have created the Newsletter Signup Form on our WordPress website, but it’s just in our backend. Unless we add it to a page, website visitors won’t be able to see it. So, let’s add it to a page.
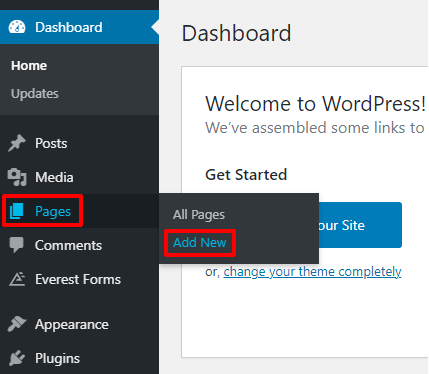
Firstly, go to Pages >> Add New to add a new page.
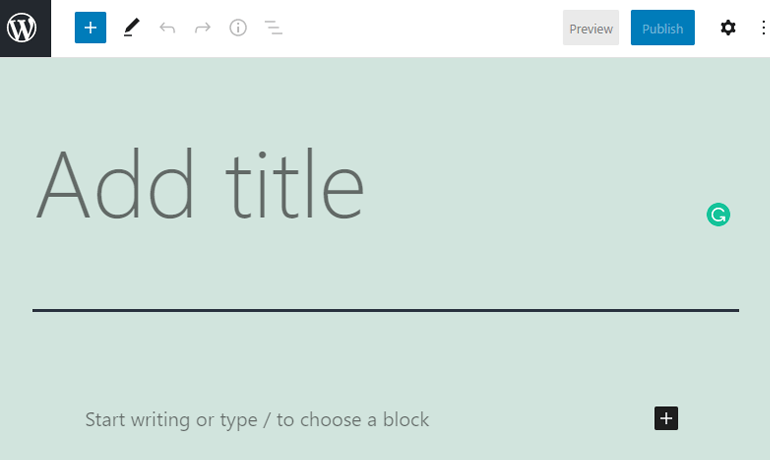
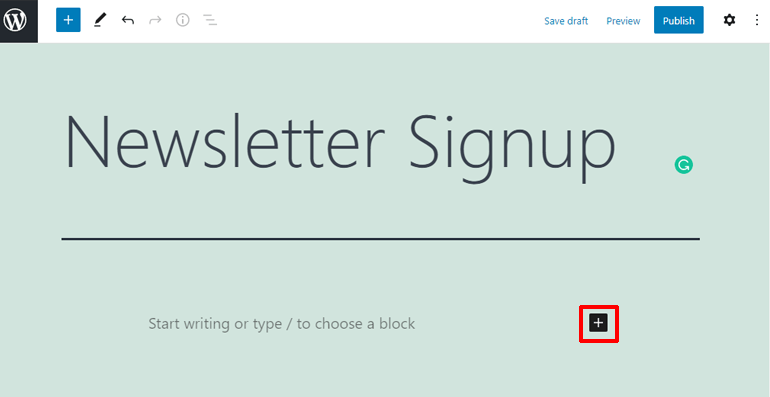
WordPress will take you to its page editor. There, give your page a title and add some text if you want.
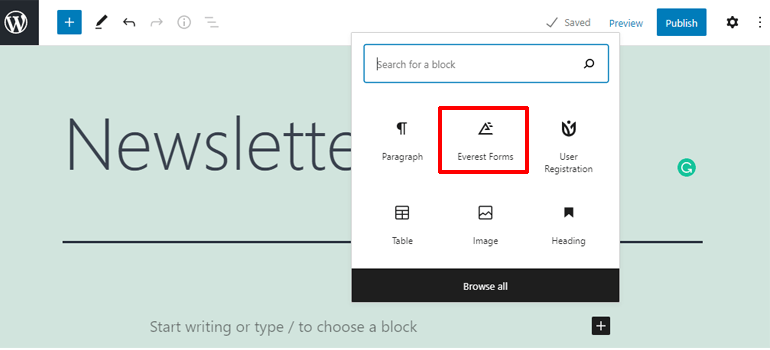
To add the form to your page, click on the little plus icon. This will show you some blocks that you can add to your webpage.
Click on the Everest Forms block.
As soon as you click on the Everest Forms block, you’ll see the block of Everest forms being applied to your page. In that block, you’ll see a radio button to choose a form. You can select your form from there.

Finally, hit the Publish button on the top right corner to publish this page.
Congratulations! You have successfully created and added a Newsletter Signup form to your page.
Step-7: Integrating MailChimp with Everest Forms
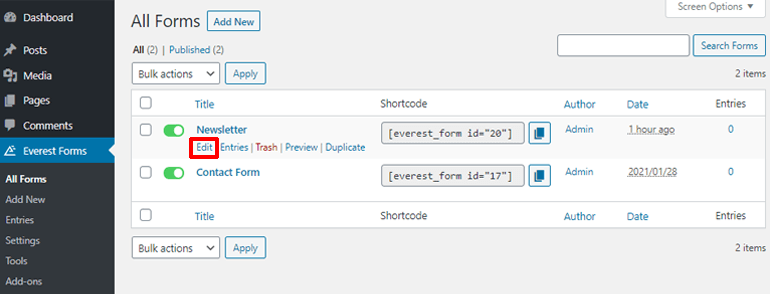
To integrate MailChimp with your form, first, select the form. For this, Go to Everest Forms >> All Forms.
This will take you to your forms list. Hover over the form you want, and click on the edit button below its name.
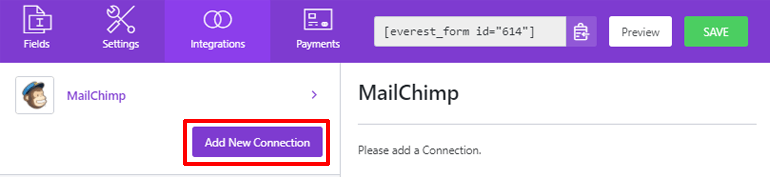
You’ll be taken to the form editor window. In the form editor window, there are four major tabs on the top. Click on the Integrations tab since we want to integrate MailChimp.

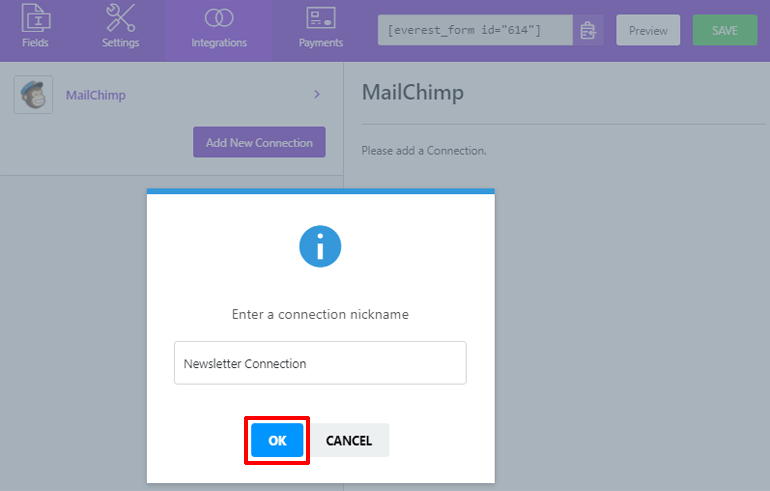
You’ll see the MailChimp section because we’ve already installed the MailChimp Add-on. Now to set up a connection between your form and MailChimp, click on Add New Connection.
MailChimp will ask you to name the connection. Type a name for your connection and hit OK.
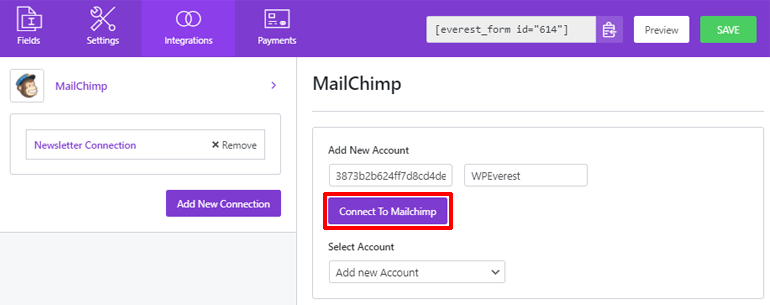
Then, on the right section, you’ll see fields to add the API key and your MailChimp Nickname. Paste the API key that you copied and enter your MailChimp Nickname. After that, click on Connect to MailChimp.
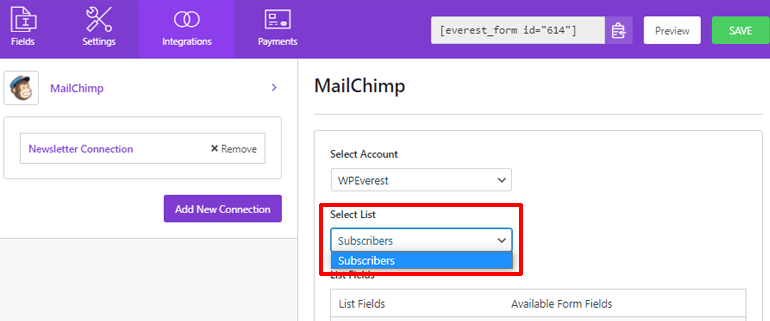
To select the MailChimp list you want to update, click on the Select List radio button and select your list.
And, you will now be able to choose which form fields will be able to update your MailChimp list.
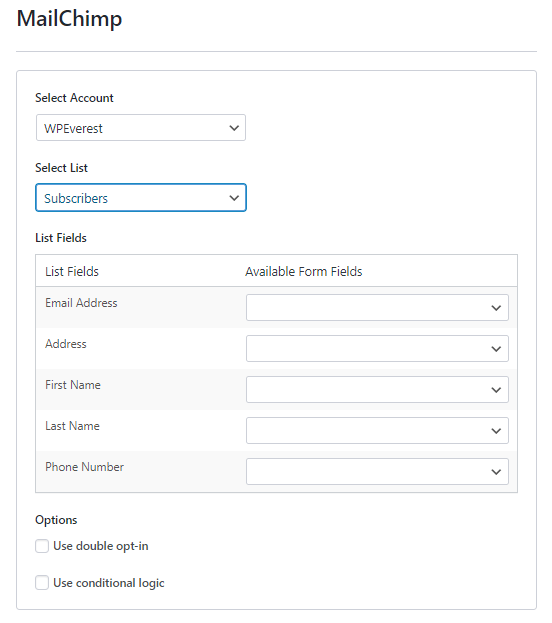
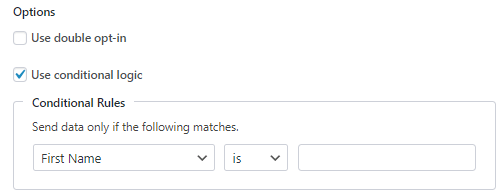
You will also have other options like double opt-in and conditional logic.
If you check the Use double opt-in option, then users will need to verify their email. They will receive a confirmation email with a verification link. And once they verify, the email address will be added to your MailChimp list.
The other option is conditional logic. By checking this option, you can make users add as subscribers only if they fill out a certain field. And you can choose what field that is.
Lastly, don’t forget to save the form. And that’s how you can integrate MailChimp while creating your Newsletter Signup Form.
Conclusion
Knowing how to create a Newsletter Signup form in WordPress is one of the first and most important steps for extending your business online. And MailChimp is one of the best web applications when it comes to email marketing.
Form builders like Everest Forms are some of the best in the market. And with its functionality to integrate with MailChimp, it becomes one of the best email-marketing tools as well. You can fully customize the form and easily update your MailChimp lists through your form.
Was this article helpful? If it was, then please share it and give us feedback.
If you want to create a newsletter form that pops up, check out our article on How to Create a WordPress Popup Form?


![Zakra 3.0 | Zakra Pro 2.0 Release [Major Updates!]](https://i.ytimg.com/vi/g3rifl7kWvg/maxresdefault.jpg)